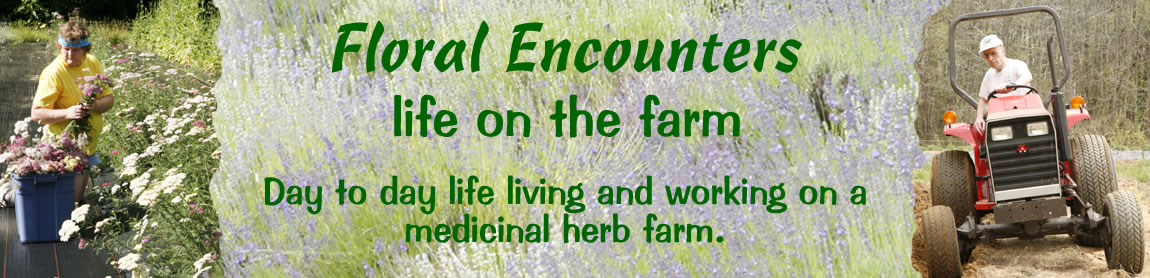
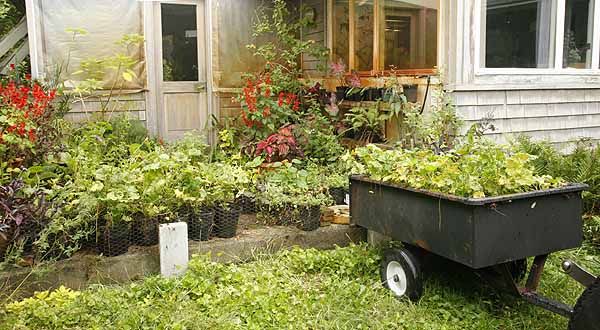
Frantic last harvesting of tender plants is in full swing.
It’s always tempting to leave things until the last moment, especially these days when the climate is so unpredictable. Used to be that frost date meant frost date but now it could be weeks or even a month later than the normal frost prediction date. The frost date is taken as a averages of when the frost has appeared in the past, its not totally accurate but for most years its been pretty close. However with the constant climate changes these predictions are becoming more of a guess and frost dates can be way off. This year the first frost date for our area should have been October 15th but we had weather in the 80’s after that. Moving plants to a ‘warmer’ location at that time would have fried the poor little guys.
It’s the same with vegetables. On our farm peppers are still flowering right up until the frost every year. There is no point harvesting them, ‘just in case’ it could be weeks before the frost hits and a lot more peppers could be enjoyed. Same with other crops. So we leave them.
Then the frost warning comes through the national weather service and there is a mad scramble to get everything harvested before the frost hits. From experience we know what plants will survive a mild frost and those that wont. All the peppers need to be harvested, the semi tropical leaf plants like Manihot and roots of things like Jewels of Opar. It’s a lot of work and our cold storage is stuffed to overflowing by time we have finished.
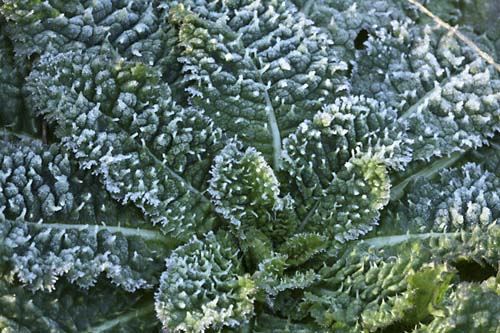
Floating row cover over green bean crop
Any crops that we still want to hold onto after the frost need to be covered in floating row fabric. This can either be draped directly over the row or made into a kind of tent structure if the plants are tall.
You can do this yourself in your garden if you have crops or plants that you want to protect. Many places sell floating row cover or if you only have one or two plants you can cover them individually with plastic shopping bags. Weigh them down with stones or other heavy objects so they don’t blow away in the wind. Once the frost has gone the bags can be removed. This is only supposed to be a temporary measure to keep the plant alive until you can do something with it. Or in the case of crops for a few weeks to either extend the length of the growing season or to protect crops that have not yet finished fruiting.
This year for us its green beans. We planted a late set of green beans because we ate so many of them this year, and we sold some too. We realized we would not have enough for the family through until next season so planted a late crop. These have not yet finished maturing so they will be protected until the beans are ready.
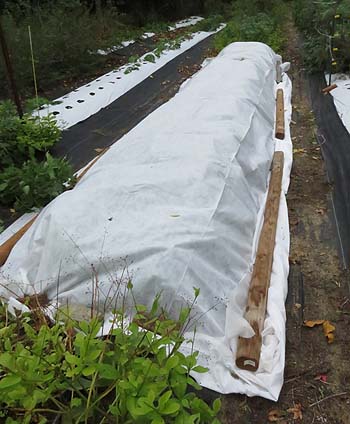
Every year we protect the Cape Gooseberries. These plants grow tall and always continue to flower right into the frost. There are a lot of fruits that wont mature but a lot that will if give a little more time. Next year I want to put up a hoop house over them and extend the season even further, but we don’t have time this year.
Of course this is just a mild or light frost or freeze, down to 32°F (0°C). It will kill tender plants but most of the hardier ones will be fine until we get a hard or killing frost that goes down to about 24°F ( °C). This will kill off everything. Long range weather forecast is not predicting this for at least another month, maybe more so we have time to harvest the rest of the leafy greens and the root vegetables and herbs before the ground freezes.
Knowing when your first frost date is in important to any gardener. If not it can be really disappointing to go outside and find all your tender plants wilted down and dead. Keeping and eye on the weather and listening for reports of frost is always important. Learn when the frost dates are for your area. The Farmers Almanac has a nice clickable map to help you out.
In the Northeast October is the month to plant your garlic. Usually I plant a little earlier in the month but this year has been so warm that I delayed it a little.
Garlic is like daffodils you plant it in the fall and harvest in the summer. The bulbs put down roots over the winter and create shoots in the spring. You don’t want to plant too early and have the bulbs create much in the way of shoots before the winter comes as they can get damaged by the cold weather and not perform as well in the spring. Last year this is what happened to my garlic. The weather was too warm right up until Christmas and the garlic grew too much. All my soft neck garlic was damaged and died in the winter snows. So plant as late as you can, but not too late that the ground is going to freeze and the plants don’t get time to establish. This used to be easy to do but with the constantly fluctuating weather theses days its more of difficult and luck than judgment.
The first thing to do is to prepare the bed where you want to plant your garlic. This article will cover that in detail the next will explain how to choose the right garlic and how to plant it.
We don’t grow garlic commercially yet, mainly because we are not set up for processing. We just grow for our own consumption, and eat everything that we grow.
DETERMINING WHERE TO PLANT YOUR GARLIC.
Location is important. It needs to have full sun especially in northern areas, in zones below 7b some afternoon shade is recommended to stop the tops scorching in the heat. Garlic needs a good rich soil to do well in so good bed preparation is very important. Adding a lot of organic material is essential for good garlic growth.
I will take you step by step through our garlic bed processing. For this you can adapt to suit your own personal plot of land. This bed preparation process can be used for any vegetable at any time.
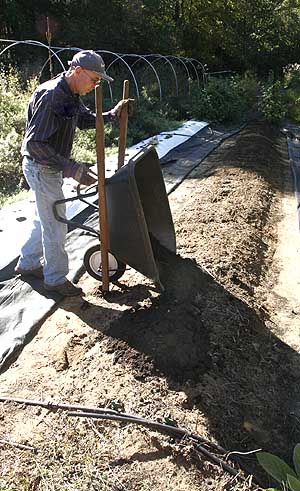
Location of garlic bed before any preparation
1. Clear the bed.
Since garlic goes in so late it can easily follow a crop you already had in the vegetable garden. Its still a good idea to plan ahead as to where you intend to plant it so you know which crop to put there before the garlic crop. As with any crop don’t plant it in the same location for at least four years. Rotation is very important in vegetable gardening.
In our case we had second batch of yin yang beans in this location. These were grown for dried beans. The bed has just been cleared of beans down to the bare earth but still needs some work.
Remove irrigation lines and rake up debris
2. Removed the irrigation lines and then raked up all the debris and removed any weeds that were left after the initial cleanup.
Adding compost to bed row.
3. Add more compost! There can never be enough rich soil for garlic. So even though we had added compost to this row in the spring before we planted the beans we add more now for the garlic. This also helps to replenish anything that the beans took out of the soil during the summer months.
We use mushroom compost we get from a semi local mushroom farm. In our area its cheap and very effective.
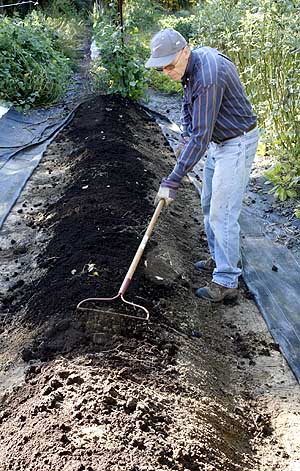
Rake compost out so its even on the row
4. Rake the compost down along the row so that it is evenly distributed.
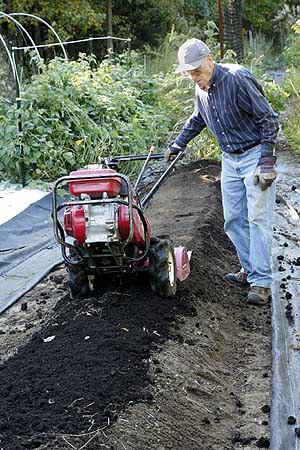
Rototill compost into bed
5. Rototill the compost into the row. This is a little tougher since rototillers are designed as a ‘walk behind’ machine but you really don’t want to walk on the bed that you have tilled. The soil needs to be as fluffy and aerated as possible. Never tread on the soil that you have tilled it defeats the object of tilling it. This is why we use beds three feet wide. That way we can work on the bed from both sides without ever treading on it. Some people say you can work a four foot, even six foot bed from both sides but I can’t. We experimented and decided that three feet is optimum for us.
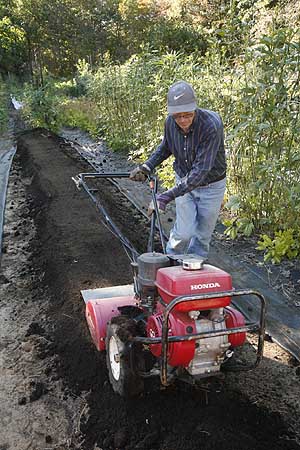
Walk beside rototiller to ensure bed soil stays fluffy and aerated
6. Walking beside the rototiller and getting it to work the bed is more challenging to hold it into place but its worth the effort. The tiller produces a nice flat top on the row and the only piece that needs ‘fixing’ is the start spot where the tiller was maneuvered into place.
Completed tilled row with compost well mixed into soil
7. The completed tilled row. A little tidying may be needed along the edges if any of the compost rolled off during the tilling process but for the most part its done. This stage can also be dug by hand especially if you only have a small section that you are working with. We often dig small sections or really narrow rows by hand but when we have a bed this long we now use the rototiller.
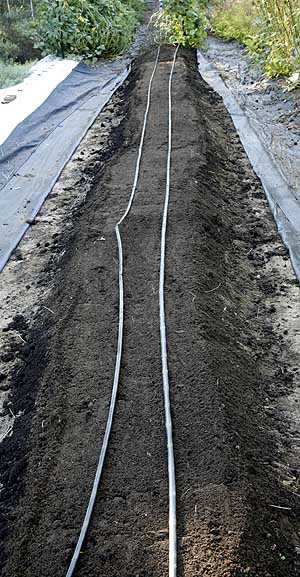
lay irrigation lines on bed row.
8. Replace or install irrigation lines. We use T-tape for all our irrigation. Its basically a drip tape with little emitters that slowly drip water onto the soil at specific intervals. We use 6 inch spaces, which is usually used for strawberry production but its perfect for garlic. Unfortunately this tape is only sold in large reels for commercial usage. However a soaker hose will work just as well and is ideal for a small garden. Lay your soaker hose out in lines down the rows.
9. Connecting up the irrigation lines – our case T-tape – to the water supply line. We have these running to all the rows in our fields. However its just as easy to connect up a soaker hose to a hosepipe or create your own irrigation system. Big box stores like Lowes and Home Depot sell connectors and pieces for you to create such irrigation systems if you desire. However they don’t sell T-tape.
Connecting t-tape irrigation lines to water supply lineLaying plastic mulch over newly prepared garlic bed
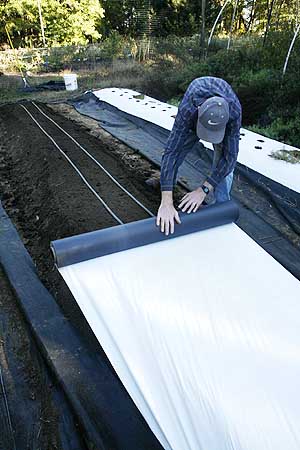
10. Laying the plastic mulch. We use plastic mulch on all our crops. This serves several purposes. First it keeps down the weeds. This is the major reason that almost all vegetable farmers use plastic mulch. Weeding is a massive problem and can be extremely costly, using mulch keeps the weeds down and thus the cost of weeding. You only get weeds in the holes that are made in the plastic. This can still mean a lot of weeds but its easer to control and rows do not get out of hand. Garlic does not beat out weeds and needs constant attention so mulching with something is important.
The other reasons for using mulch is that it keeps the ground moist, the soil does not dry out as fast and the plants are able to access available water more readily. We use white plastic because it helps to keep the soil cooler in the summer months. Black plastic can make the soil very hot.
Downside of plastic is that rain cannot easily reach the crops. They must be irrigated. However this is a small price to pay for weed suppression.
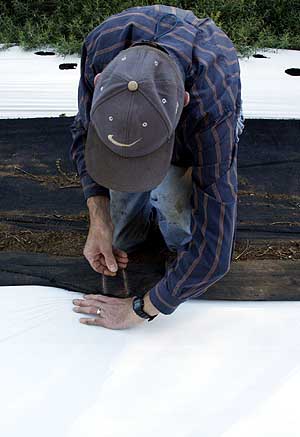
Staking down the plastic mulch to keep it in place
11. Staking down the plastic. While most commercial farms use a mulch laying machine and bed former this involves using a lot more land as the space between the rows must be mulch wider. We don’t have enough land to do this and we could not afford such a machine either. Thus we lay all our plastic by hand. These machines bury the edges of the plastic in the soil. We use ground fabric to keep the weeds down between the rows and stake it thorough the plastic to keep both in place. This works every effectively in most cases.
Mulching your plants.
Plastic mulch only comes in large rolls for commercial use, However there are several options available in garden centers for mulching around plants. For small areas you can also use a layer of leaves mixed with grass cuttings. Don’t use just grass cuttings they tend to mat and attract molds. Newspaper and other materials are also good mulch materials. If you are using a organic mulch such as leaves chopping them a little first is recommended so that they stay in place. Make sure that they layer is at least 2 inches thick or it will not suppress weeds.
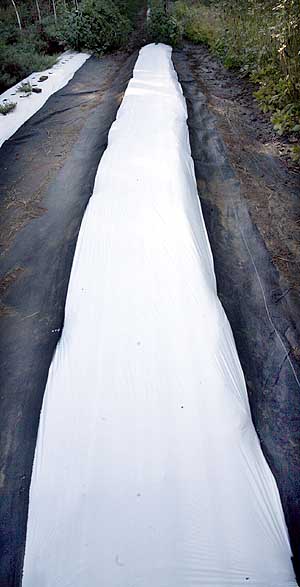
Newly completed garlic bed ready for planting.
The ideal mulch is a layer of leaves with a layer of grass cuttings on the top. The leaves are excellent mulch but can blow away in the wind. The grass cuttings spread to about ½ inch keeps the leaves in place by forming a mat. You need only enough grass cuttings to form a thin layer over the leaves or other material to keep it in place.
Don’t make the layer too thick or it forms a dense mat that will repel water and can encourage molds to form. It is easier to put the mulch down first, the pull small holes in the mulch where you are going to plant your garlic, or whatever else you choose to plant. If mulch is put in place after the garlic bulbs are planted it is often quite difficult to determine exactly where the bulbs are and where the spaces in the mulch should be.
Newspaper can also be used as a mulch but it is not recommended that you use pages with color as the dyes in the inks could be toxic to the soil.
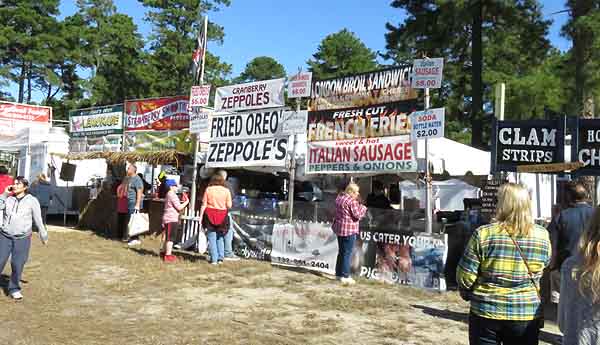
Chatsworth is a village in the center of the massive New Jersey Pine Barrens. Actually it’s the largest village in this massive 3,000 square mile area of pine forest, swamps, cranberry bogs and blueberry fields. For most of the year it’s a small quiet village of about 800 people but one weekend in October it explodes with people.
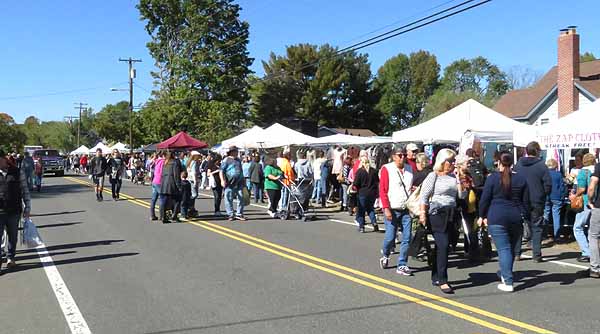
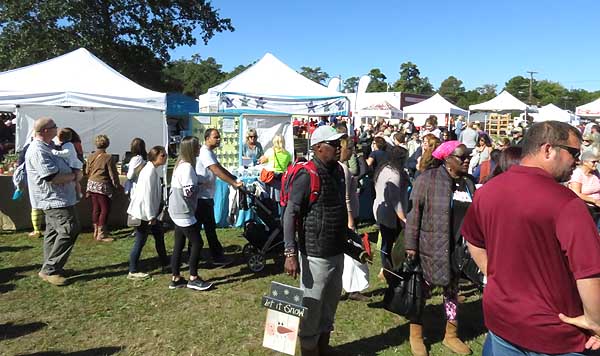
This festival has grown from humble beginning as a actual cranberry festival to a huge ‘craft’ show. It has been years since we last attended the show, at least 15 maybe more. This year we decided to take another look. The event begins at 9 am and being early birds we decided to get there when it opened. We knew it would be busy and parking is always a problem. We arrived at 9.03 am and the place was already thrumming. There were people everywhere with locals jumping up and down trying to get you to park on their little side street or front lawn for $5.00. We opted to drive farther into town and park in the local school. The website said that the parking here would be $5.00 but it had changed to $10.00 by time we arrived. Checking online after we came home seems from what others have said that this is a common yearly practice. Still it was closer instead of hiking half a mile from the earlier parking options.
Obviously a lot of other people decided to start early too. The stalls were all busy, and there were a lot of them. Every square inch of the main street in this little town is covered in vendors. They cover parks, open lots and cram onto the front lawns of the houses, it seems everyone in the village gets in on the act.
Portion of the crowd at the Cranberry festival
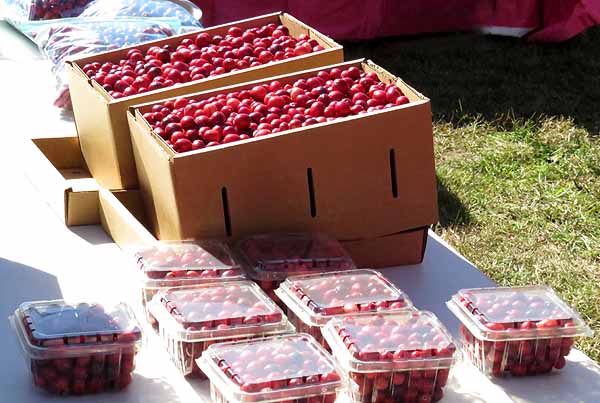
Its certainly grown a lot since we were last here, but sadly the concept of the ‘cranberry festival’ has been demoted to almost but not quite yet non existent. When the festival started in 1983 there was much more of a cranberry theme. When we first attended back in the mid 1990’s it was still strong. By that time the parade had gone, too many people in the way, but there was still a lot of cranberry theme in the event. There was a cranberry show which highlighted the different kinds of cranberry and cranberry competition for best all around. There was a photo contest, a recipe and tours of the local cranberry bogs to watch the cranberries being harvested. One corner of the town was piled high with boxes of fresh cranberries which were sold by the scoopful. It was small town America at its best.
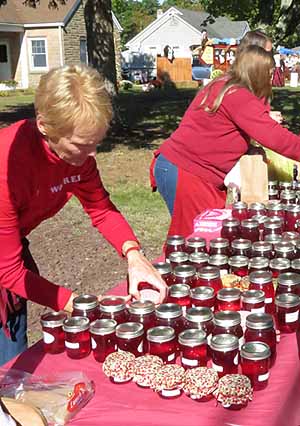
Today things are very different, gone are the competitions, the cranberry tours, and this year the recipe and photo contests were eradicated. There are still a few people selling cranberries along with cranberry preserves, cranberry chili sauce and a cranberry baked goods but they need to be sought out. Most are clustered around the White Horse Inn which is the center of the town and the vendor check-in point.
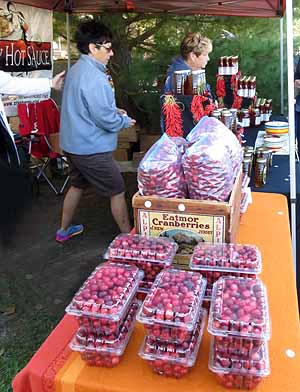
Selection of Cranberry preserves on saleFresh cranberries for sale
Most of the ‘festival’ is just one giant craft show. Festivals.net one of the best sites for craft vendors reports that there are 150 craft spots with 14 food vendors. It also reports that the show is juried, which usually means that vendors have to have decent quality before being allowed to exhibit. This might be true for part of the show and there were some fairly decent craft booths in one portion of the show. However the rest of it is more like a giant flea market than a craft show. This section is obviously not included in the 150 craft spots and there are way more vendors that this in attendance. However there is an enormous amount of buy/sell merchandise on sale. There were also way more than 14 food vendors. This was certainly needed since 14 vendors could not possibly have handled the massive throng of people attending the show. There are at least two specific food vendor areas with other vendors dotted around as well. One area has food vendors in circle with picnic tables in the center and a stage with live music at one end. This was the only stage that we located during this years festival.
Food vendors at cranberry festival
The number of people estimated to attend is high, Festivals.net stated reported 75,000, this is the number stated by the organizer. However many articles written about the event including one by the New York Times from way back in 1997 gives an estimate of 100,000. So its hard to believe that the number has not increased greatly since that time. There was certainly a much larger crowd there than the last time we attended.
Its obviously something for people to do on a sunny October day and its promoted as one of the most attended festivals in New Jersey. The weather this year was wonderful, bright sunshine all day long. It started off cool and coats were needed during the first section of vendor exploration, and at this point a coffee would have been nice. However by time we had ambled through the crowds to the vendor selling coffee it had warmed up so much that the coats were returned to the car and ice cream was more the desired food. A local vendor outside the White Horse Inn claimed to be selling cranberry ice cream but sadly it turned out to be more of an artificial tasting water ice come sorbet with far to much what tasted like artificial sweetener in it.
Everywhere there were people carrying large parcels and oddly shaped items from purchased from vendors. If you come to the festival bring plenty of cash. Chatsworth’s location in the center of the pine barrens means there is no cell tower close and cell phone coverage is spotty and limited. Most vendors who do take credit cards cant because they are unable to get a signal. Keep your family together as calling the lost member and arranging a meeting spot is impossible. I saw many people attempting this and becoming agitated with no signal and being unable to contact lost family members.
stalls at cranberry festival
Interestingly information on what happens to the proceeds of the cranberry festival are sketchy. The festival itself is run as a non profit organization and the brochure that the festival puts out, which has no information about Chatsworth or anything to do with the village at all, states briefly that the ‘proceeds go to benefit the White Horse Inn’. Checking the festival website produces no more information about the White Horse Inn or what its for at all. A little more investigation reports that the festival was started to raise funds to restore the White Horse Inn which was in a very bad state of repair. The project was awarded a grant of $45,668 in 1991 from the New Jersey Historic Preservation Bond Program to help with restorations.
A New York Times article from 1997 reported that Ms. Mary-Anne Thompson an environmental lawyer who helped found the festival in 1983 as an educational, agricultural and cultural celebration of the Pine Barrens estimated that it would take an additional $100,000 to turn the White Horse Inn into a Pinelands museum and senior center. An article published in 2008 by NJ.com stated that the renovation cost was now at $800,000 and restoration was still not complete. Most of this money has been covered by the proceeds from the cranberry festival and of course the grant. The New York Times article reported that the festival was estimated to gross over $100,000 per year at that time (1997). It’s hard to understand how restorations are not completed by now, some 33 YEARS after the project was first begun. It’s also hard to understand why all the money from the festival is still going to fund this restoration and why there is so little information about the Inn, its purpose or anything about the suggested museum.
More recently the other historic landmark the General store known as Buzby’s has come up for sale. The current owner Marilyn Schmidt bought the place in 1998 when she was 67 years old. At that time the place had been vacant for seven years and was in a very decrepit state. The old building built in 1865 needed to be gutted to the walls and restored to its former glory. This was achieved a matter of a few years and Schmidt has operated the store for the past 18 years. Now at aged 87 she want to retire. The store which is the only one for at least a 10 mile radius is a landmark. Sadly there are no takers to purchase the store which has been on the market for at least two years.
The amazing thing to me is that one old lady (with help of course) can completely restore a building and have a store running in only a few years while the White Horse Inn with masses of funding from the Cranberry festival is not completed after 33 years. If Chatsworth is so concerned about its history and heritage why not use some of the funds from just one year of the festival and buy the general store to add to their historic collection and allow this valiant, courageous proud American lady to have a good retirement.
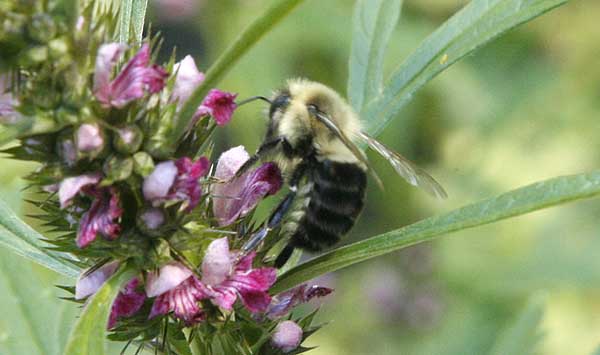
Last week I had the opportunity to attend an interesting day long workshop given by the Xerces Society on conservation of pollinators. It was a very interesting and informative day of presentations by people from the xerces society and from Rutgers University. I have become extremely interested in this subject especially this year since our pollinators seem to have diminished so much.
While a lot of the material they provided was aimed at farmers, who really need to be the ones that need to understand the importance of protecting pollinators there was a lot of material that can be used in the home garden as well.
While there was a very high turnout for the class, in fact it was full with a long waiting list, I had several friends who wanted to get on it but could not. I was disappointed to see that although the course was aimed at farmers only about half the people in the room where actually of that profession. There were quite a few master gardeners looking for education credits and some just interested gardeners. I truly commend these people because it is very important that we try as hard as possible to make a difference in our surroundings and help the pollinators but I was unhappy that more farmers had not attended as I am concerned that they are doing the most damage. However I may be wrong in some aspects of my hypothesis.
Over the next several weeks I will discuss many of the important points that were made at this workshop in an attempt to encourage everyone out there to create gardens that will help to attract pollinators and create habitats that will be irresistible to these creatures. Its easy to do and almost any person can do this. Even if you hate gardening, in fact if you do this might be the ideal thing for you to do as if its done right there is far less work to do once established than their would be to a ‘traditional’ garden.
The most important factors are to stop using pesticides and to embrace insect pollinators not just honey bees. Sadly far too many people are afraid of ‘bugs’ most in the mistaken belief that they are dangerous or will bite them. While a few are nasty bloodsuckers most are not. Learn to appreciate these gentle creatures and not just blindly eradicate them from our gardens. A lot of them are there to help you if you let them. Its up to you to appreciate and save your little corner of the world. YOU can make a big difference and start educating your friends and neighbours to make a difference too. All together you can change your world.
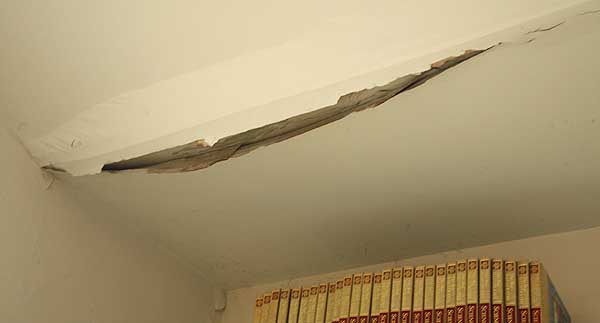
It’s been leaking for a while now, but only a little bit. At first it leaked only a very small amount when the wind was from the south and a certain angle. We got a few drips once a year perhaps. We could live with that, we had to there was no money to fix the roof.
Then Hurricane Sandy came along and really shook things up a lot. During Sandy it managed to find its way down between the wall and produced a nice bulge on one of the walls which later of course all the plaster fell off of. Then fortunately it stopped again at least for a while. Then last winter it began to leak more and drips were coming down from the ceiling, creating a nasty pealing patch. Not satisfied with that it decided to move the location of the drips around a bit, just to keep us on our toes I suppose. This meant that instead of having one drip tray in the room we had to have several located over several spots in one room. This room is of course the one we had chosen to keep all our books in. So we had to put plastic on top of the bookcases and drip trays along the top as well. Then it moved again and sneaked down the wall in the laundry room (only called that because the washing machine is in there, its more of a mud room come everything room really).
We agreed the time had come, we had to get the roof fixed. We got some quotes and decided on a roofer but got held up looking for someone to dismount our solar panels so we could have the roof redone. That was a bust. They wanted more to get the panels off and on again than it would cost for the roof! What a crock! Fortunately that portion of the roof is not leaking and is well protected by the solar panels so after calling around quite a few places and getting ridiculous quotes we have decided to go ahead and get the rest of the roof done, leave that portion and work on the panels ourselves later. Then get that portion done. The roofer has no problem with this either. It will cost a bit more but we cant wait around any longer and we don’t have time to do it ourselves this year.
So we signed the contracts, in celebration the heavens have opened and its been raining for two days, we have trays everywhere in the ‘library’ catching water.
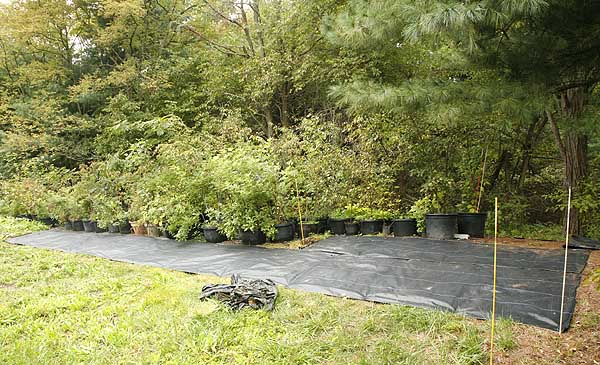
Our main problem now is that we have to remove everything from around the house so that they can get to it. I use our patios especially the front one as nurseries for the plants that are not ready to go in the ground yet, or don’t have any space yet. We have a lot of plants crammed on our front patio. We are intended to move them to a temporary hoop house that we will be erecting to protect our larger pots of trees and shrubs, just make it a little bigger and put them in their too. However we had planned to have more time to do this. The roofers are coming in two weeks so we have to get the plants moved NOW.
Potted plants being moved from our patio nursery to winter protection area.
So before the big rain started we were out laying ground cover fabric where the hoop house is to go and moving some of the plants off the patio to the new area. I loaded up the small cart and we managed to get all the smaller plant pots moved over before the really heavy rain started. We got wet but not too badly.
Unfortunately there are still a lot of plants that are in pots that are too small to overwinter. So a mammoth repotting session was in order. We make up our own potting mixture using mushroom compost as our main base (because its cheap here) adding other elements like pearlite and vermiculite and other thing to get it more aerated and more attractive as yummy plant food. So Steve trekked in compost and made up the mix and I repotted. For six hours straight.
Laying ground cover to hold plants from patio in wintering area.
I actually like repotting and I love to do it when its raining. I work in our small ‘greenhouse’ not a real greenhouse yet (its on the wish list) but a screened in porch with plastic on the windows. There is a lot of ventilation available and its you can hear the rain pattering down creating a very pleasant atmosphere to work in. Of course every now and again you get wet dashing outside to either put plants on the patio or collect trays for repotting but it’s a small price to pay.
I finally finished around 7.30pm. All the small plants are now in larger pots and waiting transportation to the hoop house area. Then we just have to move all the other pots off the patio and into the greenhouse for the winter. We don’t usually do this until the end of October when the temperatures fall to freezing but this year with the roofers coming we have to be ahead of the game.
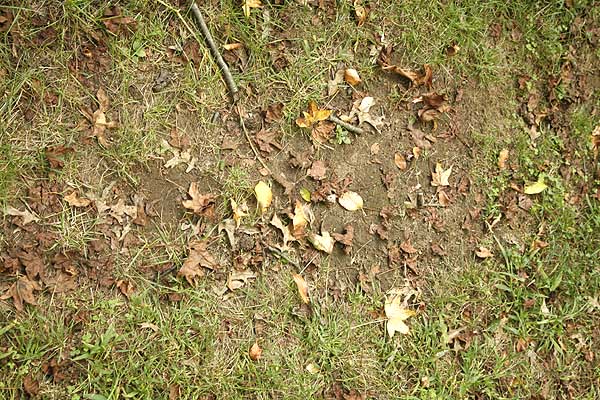
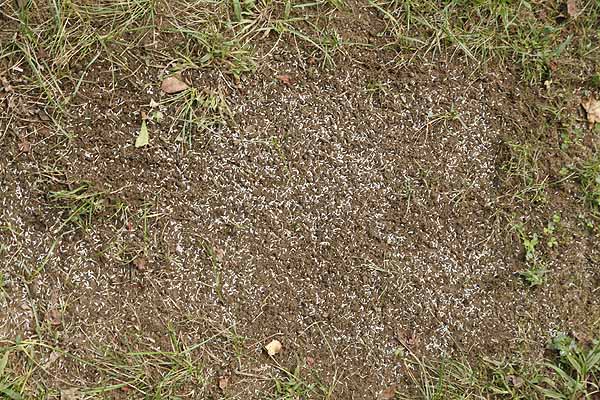
Fall is the best time to re-seed and fix lawn spots
Normally the ‘rule of thumb’ is to work on lawns around labor day here in the northeast but this year the weather has been hot and dry. Finally the temperatures are cooling down and we have had some rain moving in so at last the grass can wake up from its dormant slumber and start to grow again.
If you have any bare spots or need to do lawn renovation this is the time to do it. Putting down grass seed in the fall and early winter is the best time as grass germinates easily and at this time of the year has little competition with weed seeds. This means that it can get a good established hold before the spring when the weed seeds wake up again and try to overwhelm it. While you can seed in the spring the little grass seeds then have to compete with the weed seeds more and often chemicals need to be applied to keep them down while your grass grows. In fall there is no need for this step which keeps chemical use down. This is always a plus in my opinion.
Choose the right grass seed for the area you are working.
Not all grass is made alike make sure that you get the best variety or mix for the area that you wish to cover. See article on grass varieties. Your local garden center or big box store should have a variety of grass mixes to choose from. Big box stores however most likely don’t have knowledgeable staff that can help you choose your grass mix. A good garden center with knowledgeable staff is always a much better choice as they can give you advice on what the best grasses are to grow in your area. A lot of good garden centers are very choosy about their staff they will only hire people who are master gardeners or have other specialized qualifications.
If you want to do your own research then one of the best sites is lawngrasses.com. They have a series of questions that will help you determine what the best grass mix for your specific area is. Once you have that you can either buy it from them of note down their recommendations and look for a similar mix locally. This is a resource that I always recommend to people calling our master gardener hotline.
Prepare the ground.
If you have not done so then having a soil test done on your lawn is a good idea. If you have a large lawn front and back it’s a good idea to have separate ones done for the front and back of your property. Check with your local agricultural office or master gardener network to determine where your local soil test lab is located. Almost all land grant universities have a soil test laboratory. While you can go to a private laboratory to have your soil tested most of these do not make recommendations as to how you should amend your soil while land grant labs do. For most people this is the most important piece. Private soil labs can offer a much more detailed soil test but that is no use if you have not been trained to read it.
Once you have your soil test results you can amend your soil in the best way possible to help your grass.
If you don’t have time for a soil test now, then have one done in the spring. While most gardeners don’t really understand the use of a soil test it can make the difference between having plants and not having them. I will be doing an article later on soil tests.
Renovating your lawn is a whole different and more time consuming process and I will deal with that in a different article.
Filling bald spots.
Once you have your grass seed mix then its time to put the seed down. Pull out any really large or unpleasant spreading weeds from around the area that you are intending to reseed.
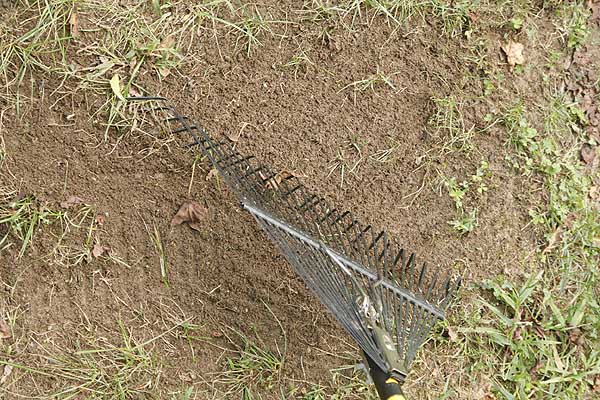
I started with the patch at the time of this article as my example. Then I raked up all the leaves and other unwanted material and removed a few weeds.Then using a leaf rake scratch the surface of the soil to rough it up a little.Once this is done scatter the seed over the area. Use a fairly dense scatter as grass plants tend to bush out quite slowly it you want a dense mat in spring you need a lot of plants. So enough seed that they are not quite touching but nearly.
Grass seed needs light to germinate but it also needs good soil contact to ensure it has enough water to swell and germinate.
Early care.
Keep the area moist. Grass needs water to germinate and grow. Often times there is sufficient rain in the fall to achieve this but if there is not go out with a watering can, for small spots or sprinkler for larger ones and water every day. Watering in the evening allows the moisture to stay around the plant for longer and not immediately burn off in the sunshine.
Keep off the area! Never step in the area where the grass seed is. Don’t step on it at all until the springtime. Grass will germinate quickly, it usually takes about a week then suddenly its all germinated and you have a new lawn. Keep it watered until the winter comes and the ground freezes. This early start will allow the grass to establish well and help beat out the weeds for next year.
Keep the chemicals in the bottles.
Try as much as possible NOT to put chemicals on your lawn. They are toxic, far more toxic that the ones the farmers use on their fields to prevent weeds. They can kill all the life in the soil, the kill butterflies and bees that are essential to our existence. They can poison you and your family, just because you can buy it easily in the store does not mean its not dangerous. While many people consider its important to have a very artificial monoculture of grass around their home its not the most healthy thing for your, your family or the environment. Its not really important if you have a few weeds in your lawn in fact its far more healthy! From a good ecological perspective the best lawn is one made up of a variety of perennial plants that create a short green blanket around your home. The objective of a good lawn it to prevent unpleasant annual weeds from taking over and having bald spots. Having clover and other plant in the lawn makes it healthy and much better for the environment. So go for a ecological lawn and not a artificial monoculture.
This is part of a series of articles on lawns, how to create and maintain healthy ecological ones.
While I know that there are some people who just love to work outside when its hot and humid, I am not one of them. I worked with someone like that not long ago. He just loved to go out in the hot sunshine and work in the fields. I loved him for it and was very sorry to see him go (to a more distant university to get his doctorate).
Me I don’t like to work when its too hot. In the summer months I get up very early, mostly when the sun comes up. Get outside and do what I need to do and get in before 10.30am when the sun gets too hot.
Now however the temperatures are cooling down and I can spend the whole day outside working without overheating. I love the crisp fall weather. Being outside at this time is exhilarating even if it does come with hard work. Its easier to work in cooler weather although its alarming just how many jobs suddenly need doing. This year has been especially bad for heat so the normal set of tasks have built up a bit more than usual. We still have a lot of plants flowering but others have finished and need to be cleaned up before winter comes and the weeds have increased in size more than I would have liked but now it can be hit hard and pushed back into order.
I like to keep my fields with a few weeds as possible. I know many farmers who don’t weed their rows much and will often abandon a crop if the weeds get too bad. It’s a tough choice, often there is not enough time to do all the weeding, the darn things grow so fast. However if you keep the weeds down and don’t let them seed, eventually you get less and less weeds to remove. Sadly I am not at that stage yet, while I have less weeds others still blow in and crabgrass is always rearing its evil head scattering seeds everywhere. While I do have a band of wild turkeys who seem to love crabgrass seeds they don’t eat enough of them for my liking. If I could just train them….