HOW TO CHOOSE A POTTING OR SEEDING MIX

Best ingredients for mixes and what to look for.

There are lots of products on the market today made to start your seeds in. There are even more potting mixes to move you little plants into. Some are great, some are good and some not so much. How do you decide which is the best for you?

First we need to understand what a little seed needs to grow best.
1. Particle size.
Small particles so that little seed does not have to push through large clumps to get its shoot up to the surface and its roots in the mix.
Think how you feel when you wake up in the morning. Warm sleepy don’t want to get out of bed. Most people feel that way, but you push the covers back and swing yourself out of bed. That’s what it should be like.
Now imagine if you woke up with a few boulders and giant lumps of stuff sitting on your chest. First you need to push these out of the way before you can even think of getting the covers off and getting out of bed. Think you might be unhappy about that. Think you are going to be late to work that day? You bet.

This is how a little seed would feel. In a fine light potting mix it can stretch, yawn, the push out its little roots and raise its shoot to the light above no problem.
If the mix is heavy and has large pieces in it, that seed has to fight to get around them. Its harder for it to put out roots is has to find a path between the ‘boulders’ to push the roots. It has to work hard to get that shoot up to the surface. Its going to take a lot longer to grow in any way. If the boulders are too big and heavy it may be far to much for the little seed and it may die in the attempt.

2. Water.
Obviously seeds and plants need water to grow. Therefore its important that the starting mix holds water well so there is plenty available for the little seeds roots to take up without being waterlogged which can lead to fungal growth that can kill little roots very fast.

3. Air
Roots need air too, they breath just as much as the shoots do. This is why many plants don’t do well in waterlogged or very compacted soil. There is no air and the roots cant breath. Good soil and seeding mixes have lots of air spaces in them to keep air around for the roots to breath. Therefore its very important that the seeding mix is not to heavy so it collapses the tiny air pockets or hold to much water and drown the roots.

SO WHAT IS POTTING OR SEEDING MIX MADE OF?

Most seeding mixes are made of very similar materials. Its how they are combined and in what quantities that is most important.

1. Peat Moss.

peat moss
peat moss

For the most part I am against using peat moss because its not a renewable resource. The one exception is for seeding mixes where it is certainly the best option to use. It is certainly a wonderful organic compound its light and it absorbs a great deal of water. It is the basis for almost all seeding starter mixes. The best ones use a very finely milled peat moss which makes it perfect for little seeds. Ones that use a harsher milled mix might be OK but often the particles are too large making it harder for small seeds to grow quickly and easily. Finely milled mixes are also easier to use in small individual cell seeding trays and they hold water well.
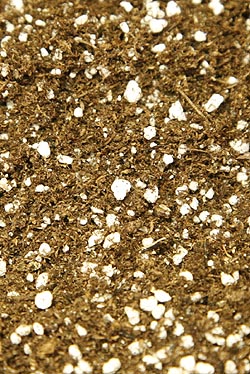
2. Perlite.

perlite
perlite

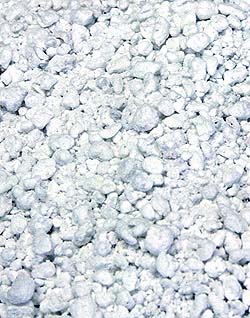
This is that white stuff you see in almost all mixes. Its actually a natural glass, another non renewable resource. Its formed from natural glass and heat, so it’s the popcorn of glass. In the same way that popcorn is much lighter and fluffier than the corn kernel kind of like popped glass just like popcorn. This means that it has a really big surface area with lots of holes for air to get trapped in for nutrients to be held in until the plant needs it. It helps to retain water so that the mix does not dry out as fast. In its natural state it is sterile so will not bring any diseases to new seedlings. Perlite is used a lot in horticulture and is a major component of a almost all seeding mixes. This lightweight bright white rock is often mistaken by consumers for polystyrene, and some cheap potting mixes in fact do use polystyrene instead of Perlite. This is a cheap trick as polystyrene has none of the good properties of perlite its just there to bulk out the material and fool the consumer.
The white color of perlite also helps to reflect light back off the seeding mix, this helps to keep the soil temperature down and reflect light back onto the growing seedlings.
The major disadvantage of perlite is that it is very light, so it can float to the surface if there is too much water or rain. If mixed with soil after a heavy rainstorm perlite often rises to the surface and floats away in large collections. This can be unsightly in the garden and is obviously no use to the soil at all. Use perlite in seeding mixes but keep it out of the garden mixes.

Perlite comes in many sizes from extra coarse to very fine. Good seeding mixes use a finely milled perlite to give a good fine mix with the milled peat moss and other ingredients. Don’t use a mix with a course perlite for starting seedlings to little seeds there are like giant lightweight boulders.

3. Vermiculite.

vermiculite medium
vermiculite medium

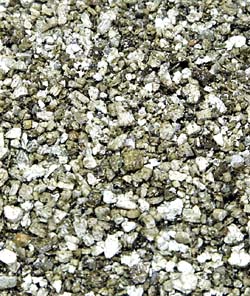
This is also a expanded mineral. Vermiculite is an aluminum-iron-magnesium silicate that forms shiny sheets rather like mica with which it is often confused. It is shiny gold brown in color. When vermiculite is heated the sheets expand or ‘exfoliate’ to form elongated concertina like particles which are lightweight, incombustible, compressible, highly absorbent, and non-reactive. The particles look like shiny fluffy puff pastry and in this state vermiculite can hold up to 4 times its volume in water. The really nice thing is that they are very attractive to cations and have a very high exchange capacity because of the surface chemistry. For your plant this means it is able to have access to a range of minerals especially calcium, magnesium and potassium as well as ammonium which are essential for good healthy growth. Instead of these minerals being washed out of the soil mix the vermiculite attracts them and holds them until the plant roots can access them.

Both perlite and vermiculite are pH neutral (around 7.0) and they are sterile making them excellent choices for potting mixes.

Many potting mixes have just these three things in them and mixed in the right quantities this is pretty ideal. Most plants do very well starting in such a mix.

OTHER MIX INGREDIENTS

Shredded bark or shredded wood.shredded bark/wood chips
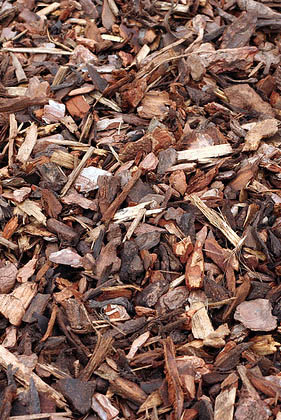
Some mixes contain shredded bark or bark mulch. This can be fine depending on a few things.
1. Preferably it’s not pine bark. This usually contains too much acid and can throw off the pH of the soil mix. Most plants don’t like a high pH so its good to get something that is neutral. If you do use a mulch contain pine bark ensure that is has been pH balanced to about 7. If not then pass it by.

more finely shredded bark, is more suitable for potting mixes

2. Its shredded quite fine. If it has large bits and twigs in it then its not going to be too good for the plants. When I think of large here I mean something about ½” ( cm) long or more. If its over an inch then its definitely a big problem. Large pieces are just like giant boulders to a little plant root. It means they have to struggle around them and cant create the root structure that they really need. The large bark segments don’t offer that much aeration of the soil either. Perlite is a much better option. If pieces are too large then they tend to float when water is added and rise to the surface of the mix. This creates more of a barrier for the little plant to fight through when its trying to grow.

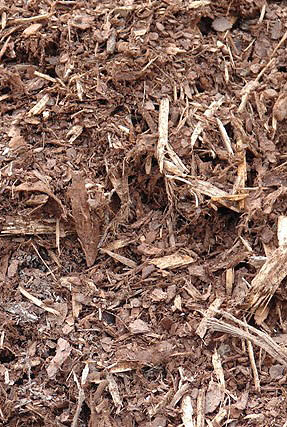
3. It’s been sterilized before the mix was made up. Wood more so than bark has lots of hole in it (like lots of little drinking straws) so there is plenty of space for water retention but those holes have been part of a tree that could have been in contact with millions of different bacterial, fungi and other possible pests. You don’t want to bring that into your mixes when starting little plants. Good potting mixes heat sterilize their ingredients before making up the mix. Check the bag to make sure it’s a sterile mix before buying it.

4. The material is well rotted down. If the bark or wood chips are not rotted down first then when the bacterial and fungi arrive (and the will arrive no matter where you put your mix) they are going to attack the chips for food. To do this they need food too and this will suck up any Nitrogen that is in the mix for the bacteria to use and take it away from the little growing plants. A well rotted mix is essential for good seedling growing.

Coconut Coir Fiber
coconut-coir
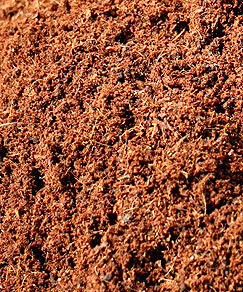
This the fiber found between the husk and the fruit of the coconut. Most gardeners are familiar with it for use in hanging basket liners or biodegradable pots. However more recently it is being ground up into much finer mulch and used to replace peat moss in potting mixes.
These fibers are a very good material for several reasons.
They hold about nine times their weight in water so they will keep the mixes nice and moist for longer periods. Once saturated the rest of the water drains away so the mix is not waterlogged. The only downside is getting the fibers fully saturated in the first place can take some time so the mix needs to be well watered before you put any seeds in it. Most good potting mixes come slightly moist to help alleviate this problem.
The major problem is that if it does dry out then it takes a long time to rehydrate it, by which time your poor little plant will be dead. If watering is done on a consistent basis this should not be a problem. However if you intend to combine it with your garden soil later in the year be aware that it drying out could be detrimental to your soil.

Grades or coconut Coir Fiber.
Just like peat moss coir fiber comes in different grades, course and fine. For starting seeds the fine grade is essential since it is milled so that the fibers are small and easy for little seeds to deal with. The coarse grade has much longer fibers and should only be used in potting on mixes.

Concerns about safely and sustainability coconut Coir Fiber.
While at one time using coconut products would have been considered a good renewable resource this may no longer be the case. With Lethal Yellowing Disease decimating and killing off so many coconut trees around the world soon it may be far more difficult to get any coconut products. Many countries have seen devastating losses of up to 85% of their coconut palms. There is no cure for the disease and trails to find resistant varieties are slow due to the slow growing nature of palms. However most trials have not found a good resistant variety so far just some that succumb more slowly. The only treatment for the disease is to inject the trees with antibiotics. After such treatment the coconuts are no longer fit to be eaten and any fibers that are produced from these fruits should not be used in potting mixes that will be used for food plants as the antibiotics could easily be transferred to the new plants.

The upshot is that using coconut fiber is now becoming suspect since there is no way of knowing if your fiber has been treated with antibiotics. I don’t like to recommend mixes using this fiber.
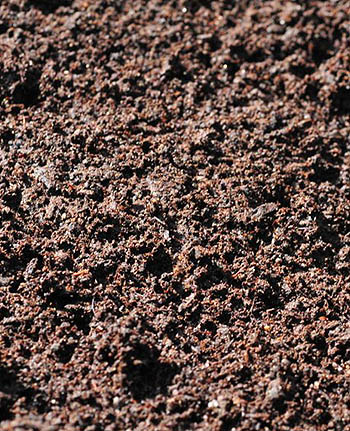
well rotted and screened compost

Compost.
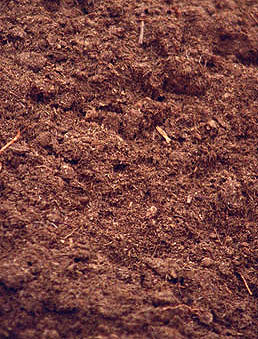
The word compost embraces many different things. For simplicity here I will describe it as ‘any organic material that has been broken down into fine rich particles.’ This material could come from other plants, wood chips, weeds, straw, cow manure, horse manure almost any plant source or plant grazing animal waste.
No matter what material is used before it is incorporated into soil and especially into potting mixes there are a few basic rules that should apply.

1. It should be very well broken down. There should not be any large particles at all. The material should look like rich black soil.
2. It is STERILIZED! Before adding any compost to a potting mix it must be sterilized. Compost is made by bacteria, fungi and other organisms feeding on the organic material. This is basically their waste product. However in its ‘raw’ state it’s still going to be full of all those organisms. This is good, if you want it in the garden. If you want to start seeds or little plants in it then it’s not. You can have all kinds of problems.
The most common ones would be.

1. Bugs. Little flies, maggots or any other unpleasant pests. They will have laid their eggs in the compost, mostly because it’s rich and it’s warm. Then later they hatch all over your seedlings. Not a good start to life. This is especially a pain if your seeds are in the house.

2. Fungi and bacteria. With improperly or unsterilized mixes you can get ‘mushrooms’ growing in your seeding mix, or you can get a fine white film growing over the top of the soil as the fungi feeds on the material that was only half sterilized. In either case its not good new for you little seedling.

It’s not always easy to tell if your mix has been sterilized or not. I have certainly had many mixes that are available in big box stores come in with little round egg case balls festooning the mix. Sadly ‘miracle grow’ mix does seem to be one of the worst culprits for this. In most cases the eggs have been killed but to my mind they should never have been there in the first place!

For the best growing results for small seeds and plants we suggest you don’t pick one with compost in it. Mostly because you can never be sure that it has been treated property and you will not be importing more problems into your home. Leave the compost for outside and incorporation into the soil not in pots.

WHAT TO LOOK OUT FOR.
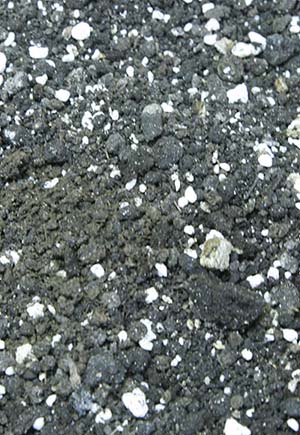
Polystyrene balls.
Some very cheap mixes use little polystyrene balls in their mix instead of perlite. This is a terrible idea. They think you wont notice the difference since they are both light and white in color. The problem is that polystyrene does nothing for the plants it just bulks out the mix for the manufacturer so you think you are getting more for your money while all you are doing is lining their pockets with case. The polystyrene does not have the open weave of the perlite it does not hold water or do anything good at all. Even worse it floats to the surface when you water it. Look closely at the mix before you buy. Never buy one with polystyrene.

Egg cases, little translucent balls or other suspect material.
Not all egg cases are visible, the worst ones with tiny flies and fungus gnats are never visible. Sometimes you will find mixes with small translucent balls about 1/8” across. These too are egg sacs. If you see anything suspect don’t buy the mix, even if its on sale. Its not worth the hassle you will have later.

THE BEST SEED STARTING MIXES.

Finely milled seeding mix

The best ones contain the above combination (peat moss, perlite and vermiculite) but milled very fine. This ensures that the seedlings don’t have any huge boulders to try and grow around but there is good aeration of the media with lots of space for water retention. Starting with perlite and vermiculite will get a fairly sterile mix and its very uncommon for peat moss not to be also. This is essential for seeding. You don’t want weed seeds, fungi, bacteria or other things in it to attack the little seedlings as they are growing. SO don’t reuse seeding mix use it once out of the bag then any failed seeds use it somewhere else or mix it in the garden. Never reuse it for seedlings. Its OK for potting on IF it is mixed with other things too but not alone.
Some seeding mixes also contain some plant food. This can be considered desirable but its just as easy to feed the seeds yourself once they start to grow. The amounts in the mix wont last long on the seedlings anyway so you will still have to feed them. Its not worth paying much extra for food in the mix when you need to feed them anyway.

Potting mixes.

potting mix
potting mix. This one is made of perlite, vermiuculite and mushroom compost

These can contain other things but the staples of perlite, vermiculite and peat moss. A good potting mix will often have a nice compost incorporated into it. The mix should still be fairly fine. If you can see larger pieces of wood chips pass it buy. Read the bag see if it states that its sterile.


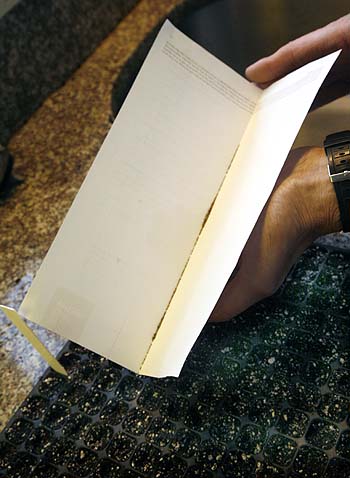
LOOK AT THE MIX BEFORE YOU BUY IT.
Yes I know the bags are sealed but there is usually one that is not. If not stick your finger in the end and pull a little out anyway. Its vitally important that you know what you are buying. If you don’t look you may end up carrying home a lot of polystyrene, bugs or wood chips. Always inspect the mix before you buy it and make sure you are satisfied with the composition. If possible buy your mixes from a good garden center or commercial store. NOT from a big box store. These places often carry cheaper materials but they are cheaper because they have not been treated properly. YOU are investing effort into starting your seeds make sure its not wasted by buying an inferior mix.
Once you find a brand you like, stick with it. You will be happier that way.

Give your seeds and little plants the best start they can have, they will reward you with better plants.

How to Protect your plant from late winter cold snaps.

Unusually early plant growth is susceptible to changes in the weather.

It’s been an usual winter, the temperatures have been high across quite a bit of the country. Here in the northeast its been in the high 60’s low 70’s for almost a week.

The plants think its spring!

Warm weather brought the lovely Japanese Apricot tree into bloom way to early.

Lots of plants are starting to come out of their winter hibernation and starting to show growth. Others are even flowering. For us our beautiful Japanese Apricots are in full bloom. If you have never seen one of these fairly rare trees you are missing out. Their blooms are wonderful. Trouble is this year they think its spring and its not. Blooming in the sunshine of 70° weather is one thing but then the temperatures are going to drop down below freezing overnight. You may have the same problem.

What to do about it?

Low Ground plants. Close to the ground and showing shoots early can be covered in mulch to keep them warm during the cold temperatures. You may want to move the mulch back again if the temperatures rise again or it will force them higher sooner to get around it. Then you will need more mulch for the next cold snap, it’s a vicious cycle.

Medium sized plants that are flowering or budding.
If they are small enough cover them with plastic grocery bags. I had to do this one year when we had a late cold snap and all my impatiens were in. The garden was festooned with plastic bags, but hey the plants survived. You can do the same, just cover the plant with the bag weigh it down with a few stones and presto a mini greenhouse. Remove the bags when the temperatures rise.

Larger plants can be treated the same way if you have a bag that is big enough. Use plastic garbage bags. Its best to use white or light colored ones DON’T use black ones unless you get the bag off early the next morning. Black will heat up fast and can fry the plants inside if they are not removed. Same will go for transparent ones if they are left in full sunshine.

Trees and other large plants.
Well if it’s a big tree there is nothing you can do. Our maple trees are flowering but they just have to take their chances there is nothing to do for a big tree.
Smaller trees can be covered in fabric. You can buy row covering fabric sometimes called floating row cover. Don’t get the really thin stuff it tears easily and is a waste of money. Get something a little tougher and either wrap the tree or if you have a sewing machine turn it into a large bag that can be dropped over the tree and tied around the trunk. That’s what we did for our apricots. It was a two man job to get the things sown as there was so much fabric it keep trying to pull out of the sowing machine, but with one person holding and the other sewing it was pretty easy. If you are a sewer and intend to do this, use clothes pegs to hold the fabric together not sewing pins, it’s a lot easier to work with.

Japanese Apricot tree covered in bag made of plant protection fabric

Floating row fabric is fairly inexpensive but you need to buy it in advance so you are ready to use it. Greenhouse megastore has a nice selection. You may need to buy more than you need as it comes in fixed lengths but its fairly inexpensive. Once you have some its easy to get out and use every year and you will be happy you did, its got all kinds of uses to keep the plants warmer in cold snaps or extend the season a little in the fall. Its always good to have some on hand. We buy it by the roll so we have enough to do any job on the farm in a hurry.

If you don’t have any row cover any kind of fairly lightweight fabric will do. Old sheets, curtains and such like can be put to use. Its never a good idea to throw out old sheets they can be easily pressed into service as plant covers. We used to do this all the time before we bought real row cover. If you have nothing on hand see if there is an inexpensive fabric store near you. Some Wal-Mart’s still have cheap fabric available. So it might have transformers or ninja turtles on it the plants don’t care. Keep the fabric around it will last for years and keep your plants warm and cozy during cold snaps. Fabric needs to be tightly woven if you can see through it or it has an open weave then it wont do the job. If possible pick a lighter color but any color will do. If you buy a bolt of it you can just wrap it around the tree to cover it all up. I used fabric and old sheets for years before we bought row cover its more expensive to buy fabric but if you need it in a hurry it’s the best option. Now I have too much that needs protection to use fabric and buy row cover by the roll.

If it gets REALLY cold.

Japanese Apricot tree now wrapped in white plastic to protect it from the late snowfalls and frigid temperatures.

Most of the time once plants have begun to flower the temperatures just go down a little below freezing. However if the temperatures go down a LOT then the fabric might not be enough to keep those precious plants warm. Then you certainly need plastic for the job. If you live in an area where there are commercial nurseries you will notice that their hoop houses are all covered in white plastic for the winter months. This is to keep their plant pots from freezing. This is the kind of thing you need to do for your plants. The same methods described above can be used to cover plants in plastic rather than fabric.
You need white or light colored plastic to let the light in. Not black the poor plant gets no light, and not clear. Putting the plant in a transparent plastic bag will get it really hot in the sunshine and encourage it to grow and bloom even more. Then it will be really out of sync with the ‘real’ world temperatures and may go into shock if you take the bag off at the wrong time.
We use the white plastic left over from our winter hoop house to cover individual trees. This was our first year doing this and our design needs a little more work but it’s a good start. Most years hopefully we wont get such massive swings in temperature as to need to do this.

If you are in a hurry.
Head to home depot and pick up some of their thin white plastic drop cloths. These are ideal for short term plastic fabric. Ideally you need something a little thicker but they will work well for a while. The major problem is that they are very thin so if the wind blows you could get holes poked in them by plant twigs and branches.

If you are covering bushes or small trees make sure that you either take the coverings off when the sun comes out and the temperatures rise or at least open the bags up so that the air can get in and the plant does not get too hot. While white plastic will keep plants a lot cooler than transparent it can still get hot under there when the full sun is hitting it. Remove the covering when temperatures rise to a reasonable night time level, but be ready to put them back on again if the temperatures fall again.
With a little care plants can be coddled through this strange weather and come out in spring with no harm done.

How to Protect your plant from late winter cold snaps.

Its Time To Start Your Seeds!

How to start seeds to get the best possible plants.

Getting a head start on winter is important when starting seeds. Most people dont realize just how soon they need to start them. IN most cases thats around the end of February to Early March. It may be later if you live in zone 5 or above and earlier if you live in zone 8 or more.

Always read the label.
Good seed companies will print important instructions about each seed on the seed packet. Excellent seed companies will send you an general instruction sheet and specific ones for seeds that need special care or treatment. Its very important to always read the instructions before you plant a seed. This way you wont be disappointed when the seed fails to come up. If you have a seed that needs light to germinate and you cover it then nothing is going to happen. If it needs soaking or roughing up first and you dont do this you may get some germination but not that much. If it needs stratifying and you dont carry this out then all you get is bare soil. So read the instructions before you start. Good seed companies let you know before you buy the seed if it needs special treatment so make sure you read any information on the website about how to grow the seeds before you buy it so you dont get a nasty shock when the instructions arrive.

Preparing to plant your seeds.
How the seed is treated is going to depend on several factors one of which is how large the seed is. Large seeds like beans, peas and such like will either need their own individual pot to start in or will be planted directly in the ground. Things like beans and peas do well sown directly other large seeds may need a little more help and need to be sown indoors first. Small to very tiny seeds will need extra care since handling them is a much tougher job. For this reason there are several different ways to grow seeds.

Seeding containers.
Most people tend to grow all their seeds in flats. This can be fine but it has severe limitations.
Its very hard to remove some of the seedlings without disturbing the others.
1. If some seeds have germinated and others have not yet done so then the ungerminated ones get massively disturbed when the germinated ones are removed. This means the others may now never germinate and your seed count just went way down.
2. New seedlings often the roots get all tangled around each other so its hard to separate one seedling from another. This damages either the roots or the stem of the little plant. Once the stem of the seedling has been snapped its a goner. There is nothing you can do to save it. Lots of plants are killed this way because separating them is such a problem.

Cell or plug trays.

Small cell plug tray. This tray has 288 cells. Used for small to small-medium seeds.

Using individual cell trays removes these problems. These trays are like flats but they are made up of small cells they are often called plug trays. Trays come in many different sizes so the correct size cell can be selected for different size seeds. Small cells can be used for tiny seeds and large cells for bigger seeds.
Advantages.
1. Each seed can have its own individual cell to grow in, or if the seeds are very tiny two or more per cell.
2. As seedlings grow they can be removed individually and potted on without disturbing the other seeds.
3. Lots of different seeds can be sown in the same tray without any problems with them getting mixed together.
4. trays are easy to work with and move around.
Disadvantages.
1. Cells dry out fairly quickly since there is only a small amount of soil in each one, especially in the tiny ones. This means that they need to be watered far more often. Cells at either end of the tray are very susceptible to drying out and its often best not to plant these end rows. Though they should be filled with seeding mix.

Seeding compost.
When starting seeds its important to use a good seed starting compost, not any old compost and certainly not the soil you scraped up from your garden. Its important to give your seeds the best possible start in life. That means a soil that is devoid of any weed seeds which would certainly be in soil you scraped up outside. You need something that it is easy for them to grow in that holds water well, does not dry out too fast and has small enough particles that the little seeds dont have to fight around large clumps or small rocks to get to the surface and grow.
Many places sell seeding compost. Look for one that has a balanced mix of components. You may need to try out several different ones before you find one that you like the best but then stick to that one.

SEED PLANTING METHODS.

Large seeds.
These are the really easy ones. If your seeds are the size of a pea then plant them in individual pots. Seeds this size dont need a really fine potting soil and regular potting soil can be used. Still dont use soil from outside as it will bring in weed seeds. There are two methods you can use.
1. Fill all the pots first
2. Water them and let them drain
3. Poke a small hole in the compost and drop the seed in, cover it. Dont plant too deeply!

OR
1. Fill the pots less about  soil.
2. Put a seed in each pot
3. Add the rest of the compost
4. water well and let pots drain.

Personally I prefer the first method, I find it easier to do but its your choice.

Filling your seeding trays.

All other seeds need to be planted in seeding trays, flats or individual cell trays. Cell trays come in many different sizes with different size cells. We use two different ones, small cells for tiny seeds and ones with 2 cells for larger seeds. Whatever receptacle you use it needs to be filled properly with seeding mix.

1. Spread the seeding mix over the tray and push it into each individual cell. The best way to do this is to pile a good layer of the material on top of the tray then get a identical tray and fit it on top to press the mix down into the cells. You may need to use two or more trays together if the trays you use are flimsy to get enough strength.

Half filled seeding flat. Used identical tray to push seeding mix into the cells. Needs more mix and repeat.

Once the mix is pressed down, add a second layer and repeat. Then its time to get in with your hands and make sure that the soil is really firmed down well. Fingers are always the best judge of how much mix is pushed down into the tray.
2. Water the mix. Using the spray option on your kitchen facet is ideal. Allow the trays to drain and the water to be fully taken up by the mix before you proceed.
3. Firm the soil down again. Often its very fluffy until its wet then suddenly you find there is very little soil in the cell or tray at all. If there is not enough soil then add more and re-water it.
4. Fill trays to within  ( cm) of the top of each cell.
5. Plant the seeds. Seed details below.
6. Spread a light layer of soil over the top of the seeds. Before you do this make sure that the seeds you are planting dont need light to germinate if they do then leave this step out.

Adding that top layer of soil.
The best way to do this to ensure that you are not adding too much is to use a sieve. A simple metal one that can be purchased in any dollar store or market stand. Place the potting mix in the sieve then shake it gently over the seed tray like sifting flour. Cover the seeds in a fine gentle fluffy layer. This gives enough mix to cover the seeds without burying them too deeply that they cannot grow. After all in the wild they dont get buried in the ground they just have to hope that they get covered up a bit. So they dont want to be deep. Just lightly covered.

Use a sieve to shake a fine layer of seeding mix onto the top of seeds. This way they are not covered too deeply and you get a good even coating.

METHODS OF SEEDING.

Medium seeds.
If the seeds are large enough to handle then they can be moved one by one into the cells or placed in rows in your seed tray. In seed trays make sure they are well spaced. Plug trays use one cell per seed. If you have difficulty moving the seeds use a pair of flat ended tweezers to move the seeds around. These are an invaluable tool for any gardener who is seeding.

Trays with larger cells can be used for medium seeds. One or two seeds per cell. These Echinacea seeds are waiting to be covered.

Smaller seeds.

Use a stiff folded piece of paper. Seeds will line up in the fold and can easily be dropped exactly where you want them with just a gentle tap.

If the seeds are large enough to see but too small to handle then the best way to seed them is with a piece of stiff paper. Take the rectangular paper and fold it down the middle in the long direction. Then tip some of the seeds into the crease in the center of the paper and shake gently. The seeds will line up in a row along the crease. If you then gently tap the paper the seeds will move out one by one and drop into the cells as you move the paper across the tray. This method is pretty accurate and only occasionally does more than one seed fall into a cell. The tweezers can then be used to move it if desired. It can take a few moments practice to get the angle of the paper and the amount of tapping required to move the seeds along one at a time but its a very useful technique and we seed all our trays using this method.

Very small seeds.
Once seeds get to the almost dust like size its harder to use the paper method as they tend to clump together. Some people use the pinch method hoping that pinching and spreading like salt on food will distribute the seeds well but it can cause clumping.

The best way to evenly distribute fine seed it is by using an old pepper shaker. Take a small portion of dry fine sand or loam – do not use beach sand unless you wash and dry it well first as the salt in the sand can affect the seedlings. Pick a sand or loam that is a different color from the seeding mix that you have chosen.

Mix the seeds with a portion of the sand and place in the pepper shaker. Shake well to ensure an even distribution of the seed throughout the sand. Then shake the mixture out across the tray. The sand will ensure a more even distribution and you can see where you have shaken by the sand color.
Make sure you buy a pepper shaker for this purpose dont use the one from the kitchen you wont get it clean again and the family will not be happy with you. Inexpensive shakers can often be found in dollar stores or market stalls.

Planting more than one species in a single tray.
The advantage of plug tray is that you can plant a lot of different seeds in the same tray. This means you can save space if you only have a few seeds. The small plug trays have 288 cells so thats a lot of seeds.
However there are some factors to consider before doing this.
1.Plant the same size seeds in the same tray. Dont put larger seeds with smaller ones.
The larger seeds will grow larger and faster and will shade out the small ones. This means that they may likely die. Plant all the same size seeds together. If using small plug trays it is often advisable to leave one row empty between each species to allow for them growing at different rates and reduce overshadowing.

2. If you have any experience with seeds or can find information on germination times then put all the seeds that germinate at the same rate together. If you have some seeds that germinate in 6 days next to some that dont come up for four weeks then the 6 day ones are going to be pretty big before the others even emerge. This will mean that they could easily be overshadowed for light and will not do anything like as well.

Make sure you label your seeds!
Using plastic plant labels is an excellent way to label seeds. This is especially important if you are planting more than one species in a tray, but even full trays should be labeled with the plant name and the date that it was seeded. This way you can monitor how long seeds take to germinate. Labeling is vitally important. It is surprising how easy it is to forget what you seeded and when especially if you are seeding many things at the same time. Always label your seeds so you dont have to guess what they are later.

Watering.
Water with a misting spray bottle or the mist setting on a hose nozzle. If you have a lot of seeds but dont want to use a hose pipe purchase a chemical spray bottle. They are sold in almost all garden stores for spraying chemicals on your plants during the summer months. Fill it with plain water and use it to spray your seedlings. Make sure you have one that is dedicated ONLY to this purpose. NEVER use a bottle that has been used for any other reason or you could quickly kill off your plants. These bottles are fairly inexpensive and come in anything from one to 5 gallon sizes. They are ideal for those with quite a few seed trays. This is the method we have used for many years on our farm.

Use a spray bottle to mist seedlings once they are planted.

Seedlings will need to be sprayed at least once a day. If they are in the sunshine they may need more than this. Small plug trays dry out very quickly so ensure that the seeding mix is always moist, not saturated wet but moist.
We prefer to keep our seeds in open air not in a tent structure that some people recommend. This can often increase fungal growth and make the seeds very prone to damping off fungus.

Once the seedlings are started to grow they will need more water so longer spraying sessions will be needed. When the seedlings reach about one inch high those in cell trays can often be watered using a thin spouted house plant watering can. The roots have bound the soil together enough to stop it floating away and they need more water. Using this method far more water can be delivered to each seedling than with the mist sprayer. Take care however if you have several different species of seeds planted in one tray. If the seeds are not all grown at the same rate then this method is unsuitable.

Once the seedling have reached the second pair of leaf stage add some liquid fertilizer to the spray (or can). The amount of food in seed starting mix is very small and in individual cells it is used up very quickly. Extra feeding at this stage will ensure strong healthy seedlings.

Lighting
While only some seeds need light to germinate it best to put all the trays in lighted areas immediately they have been seeded. This ensures that they seedlings will get light as soon as they germinate. There are many methods used for lighting.

1. By a window.
This is the most common and easiest method. Place the trays right next to the window as close as you can on a table or flat surface above the window bottom. Do not place them below the level of the window of they will not get enough light. If your table is not high enough find something to put under the legs to raise it up. Use a south or west facing window for the best light. Do not use a north facing window it will be too cold and have very poor light. If you are placing the trays narrow end to the window consider rotating them every few days so that the seeds at the back of the tray get as much light as the ones at the front.

Seed trays in window.

2. Artificial light.
Many people now use grow lights and grow stations to grow their plants. This is an excellent use but if using lights remember that even though they look bright they are not really putting out as much light as you think. The trays need to be very close to the lights. Not more than 12- 18 above the tray. The best systems allow you to raise and lower the lights as the seedlings grow. Putting lights well above the level of the trays is very similar to placing a tray in the center of the room rather than next to the window. Plants see light very differently than we do so what we think is bright to us is not to a plant.

In a Greenhouse.
This of course is the best method of all, but not available to many people. If you have this luxury make sure that it stays warm enough for the seedlings but not so hot that it will fry them when the sun comes out. Greenhouse growing is a whole topic unto itself.

Once your seedlings have grow to a reasonable size you can start potting them on into larger pots. Potting on next month.