


MAKING PLANTING CONTAINERS
Use what is around you. Recycling is great!
Lets face it most people don't have a box of plant pots sitting in their shed or garage. Now you want to grow plants. No pots No problem! Use what is around you. A little creativity can work wonders and plants don't really care what they are growing in provided its not toxic and will give them soil, water and food.
Whatever container you use make sure you punch drainage holes in the bottom. Seedlings cannot tolerate being soggy so water must be allowed to drain away or they will die.
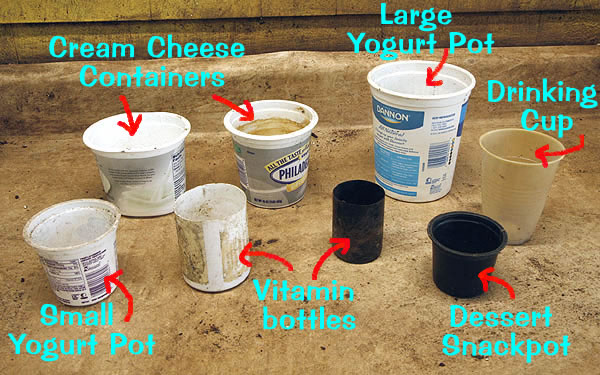
Almost any container that will hold water, provided you can punch drainage holes will be ideal. Any food container is good and lots of other stuff you may have around your house. Look at each container before adding it to that blue recycle bin. If you can reuse it then its an even better way to recycle. You can always add it to the bin after its second life as a plant container.
What not to use.
Anything that has household cleaners, garden chemicals or any other chemical
like substances. That includes things like wet wipes. The chemicals in these
tend to stick to the plastic and they can later leach out into the soil. This
could kill you plant. Or it could be taken up by the plant. If you are growing
a food plant you most likely don't want to eat any of those nasty chemicals
so put those in the recycling bin.
Seeding
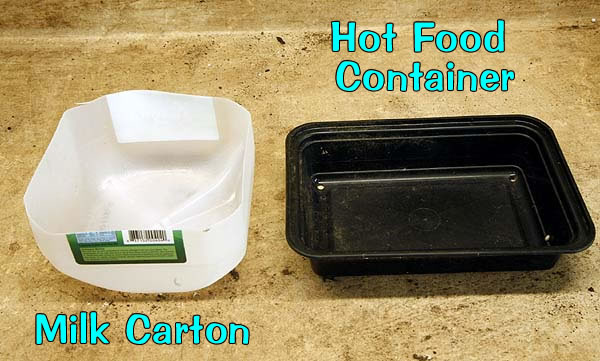
Cut the bottom off a gallon milk container. Add some holes and you have a prefect container to grow little seeds in. You could be able to fit three rows of small seeds in a gallon container. That should be enough if you are growing a 10 ft x 10 ft garden even up to a 30 ft x 30 ft should work well.
Hot food containers. If bought from the salad bar, hot food bar in the supermarket or take out food store. They either come in plastic or at least leak proof containers. These can easily be washed out and reused as seed starting containers.
If you are starting larger seeds make sure your containers are deeper. If using gallon milk containers instead of cutting off at a couple of inches cut at 4-6" to accommodate larger seeds.
Larger seeds or potting on.
Individual pots can just as easily be made from many other containers. Yogurt and snack pots are some of the best but cardboard container from juices and anything that has been made to hold fluid are good. Do not use glass containers as its impossible to safely make holes in the bottom to allow drainage.
Biodegradable.
Bare in mind that most food containers today are made of biodegradable
plastics - which is good - but it does mean if you use them outside in
the sunshine for any length of time they will start to crumble. They will
hold up for one year sometimes as long as three depending on the amount
of UV rays they take but then they will disintegrate. Storing them in
your home or garage will keep the in good condition but once outside the
process begins. Plan on using such containers for two years then discarding
the crumbling pieces.
Tougher plastics
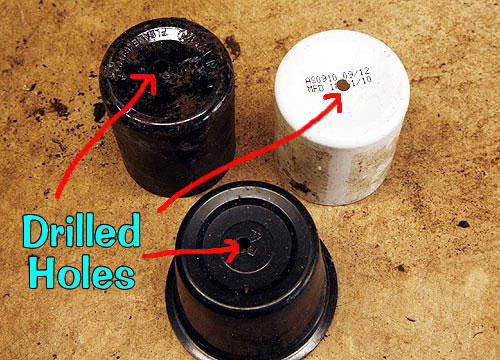
Old vitamin and pill bottles can make ideal containers for individual
plants. They have the advantage of being made from tougher plastics that
hold up longer to harder garden use. This will also apply to many other
plastic containers you have around your home. Look at everything carefully
before you throw it away. If you can use it to grow a plant in keep it,
use it then throw it away later.
When working with tougher plastics take care when cutting them down. They
are much tougher and harder to cut use sharp scissors or better yet a
Utility Knive. Take care with box cutters as the pressure needed to cut
the plastic often makes them skid around or the knife blade to break off.
Wear protective eyewear if using this kind of knife.
Shallow container such as small deli containers are ideal for using as plant saucers. If you have a larger pot that you want to keep in the house use these as 'saucers' they work very well and are much cheaper than buying them in the garden center.
Creating drainage holes.
You can use anything that will safely make a hole. For softer plastics a vegetable knife, box cutter or such like can just be plunged into the plastic then twisted to make a triangular shaped hole. For small containers one hole is sufficient but for something like a milk container several will be needed. If using a hot food container make sure you put the holes in the lowest spot of the container.
For harder containers like vitamin bottles, pill bottles or such like a drill is the easiest tool to use. You can create small but precise holes in the bottom of each container for easy drainage.
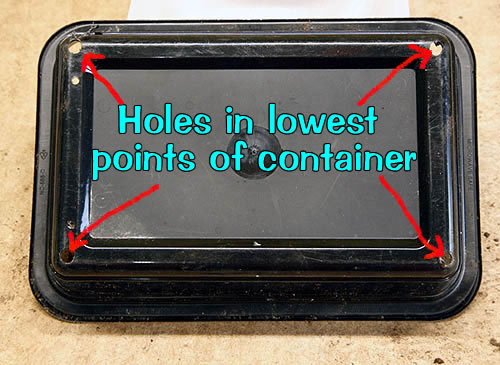
This container has a lower section around the edges. Built to drain fluids from hot food it will also drain water from your seedlings so this is where you need to put your drainage holes.
Always look at any container before you throw it away. If you can find a use for it then do so. Recycling at home is always the best way to recycle anything. Ask any farmer, we are all champion recyclers.
OTHER NEW GARDEN INFORMATION
How to start seeds to get the best possible plants.
Tools You Need To Make A Simple Garden.
How to Choose a Potting or Seeding Mix.
What Plants should I grow in my new Garden?.
Designing your garden for summer heat
Potting on your seedlings get get the best possible plants.
| Janice Hazeldine PhD is the owner and head grower of Floral Encounters an organic Medicinal Herb farm that is also a designated sanctuary for pollinators. |