


Potting On Your Seedlings
How to transform your seedlings into great plants
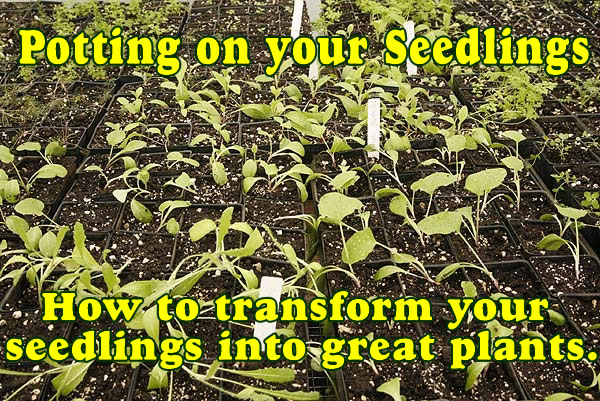
Once your seedlings have grown to a good size in their seeding trays then its time to transplant them into larger pots so they can grow to a large size before planting them out in the great wide world. Starting seeds in either plug or seed trays allows seeds to be intensely cared for while they are starting their life. Once they start to grow strongly then they need to be moved to larger pots to allow them to keep growing to a larger size before being moved outside.
Can't I plant directly outside from a plug tray?
That is going to depend on how large the plugs in your tray are.
If the cells are 1½ - 2" (3.8 - 5cm) across with individual
plants in them then most likely you can. If your plants have been hardened
off first. If the cells are smaller the plants usually cannot reach a
large enough size to be planted outside with certainly that they will
survive. This is especially true now that temperatures are fluctuating
so much due to global warming. In past times temperatures in spring did
not reach the 90's as they do now. Little plants cannot survive well in
such temperatures and tend to fry very quickly. If you are going to make
all the effort to grow your plants from seeds its all wasted if they are
put in the ground too small and die.
No matter what size plants you are putting the in the ground they will
all need to be hardened off before moving to any garden plot.
Pots for potting on.
First thing to do is to secure a supply of reasonable sized pots.
Here we use 2 ½" (6.35cm) square pots. The reason for this
is that square pots are easier to stack in a seed tray and deal with little
or no wasted space. We have found this size pot is ideal for all our potting
on needs and 32 fit exactly into a outer seed tray or carrier tray. You
can choose whatever size or shape pots that you prefer but using square
ones to minimize space is always a good consideration. We use all plastic
pots these can then be washed and sanitized with bleach so they can be
used time and again for many years. This is the most economic way to pot
plants on.
You can also use whatever containers you have to hand. Small yogurt pots
work very well, the bottoms of cardboard juice containers are also a great
choice. Anything that you have to hand that's about the right size. Just
remember to punch holes in the bottom to allow water drainage.
Potting mix.
Potting mixes can be purchased in bags from most garden centers or
big box stores. See
How To Choose A Potting Or Seeding Mix for details on choosing a mix.
If you need quite a lot of potting mix and have company near you that
supplies plants to garden centers you can always call and ask if they
sell their potting mix. Most of these companies create their own mixes
for their use and will often sell bags of it to the public. In most cases
you do need to buy several bags at once or they may have a minimum value
order. Don't call and ask if you only want one bag, you will need to be
considering at least 5 or more bags before they will even consider you.
Mixing your own.
If you need quite a lot of potting mix you can create your
own if you choose. To begin you will need to decide what the main ingredients
in your mix will be. There will be additives but the bulk of the material
will mostly be something that holds water and bulks out the material.
This can be several things. Most commonly they are
1. Peat Moss - usually the easiest and simplest to buy, often the cheapest but not a renewable resource.
2. Coconut coir - a newer material that can sometimes be obtained in bulk. Some concerns about origin when choosing this option. You might want to read Coconut Fiber For Your Plants. Good Or Possible Hazard? before you decide.
3. Rice Hulls - a newer material that is often used by growers its easy to use and very renewable.
Peat moss is most likely what you will choose because its easy to get. Most big box stores sell compressed bails of peat moss at fairly low cost. You will only need one, and it may last several years depending on how many pots you fill.
4. Compost.
Its always a good idea to add some other organic material. If you
are already composting in your garden then this is an ideal use of some
of your material. Make sure its screened first so you only have fine pieces.
If you don't have your own it can be purchased in bags from most garden
centers of big box stores, or if you are in a semi rural area you can
buy bulk compost from garden centers or compost shipping companies. The
downside is that you can only buy it in bulk usually by the truckload.
Many people club together with neighbours and buy a truckload then divide
it amongst themselves. The material is great for mulching around plants,
adding to flower and vegetable beds as well as making your potting mix.
If you have the space piles can be left outside and used slowly through
the year or two. It's a great investment at very little cost. If you can
obtain this in bulk its very inexpensive and can be used about 50:50 with
the peat moss when mixing a potting mix.
Here at Floral Encounters we use mushroom compost. Simply because it is cheap and readily available. This will not be the case in most parts of the country but we live near the major mushroom growing areas and they have tons of spent compost moving through their houses daily. We buy well rotted (for one year after leaving the compost house) screened organic pH balanced compost by the truckload. We then use it on our fields and for making our own potting mixes. Whatever you choose ensure that this material is MOIST before creating your mix. Not wet but just moist all the way through so when you grab a handful it feels slightly moist but not wet. The material you choose should separate easily and be slightly fluffy to the touch.
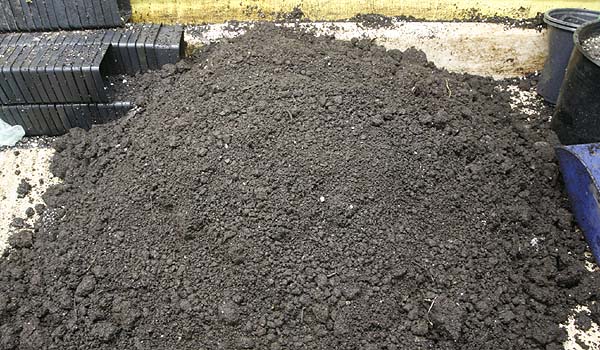
Mushroom compost as part base for potting mix
DO NOT use soil from your garden. This is always going to be too heavy and it will contain lots of weed seeds and other material that could be detrimental to the growing of your small plants. This may seem strange since you are going to put the plants in the soil later but soil outside in the ground behaves very differently to soil in pots in a tended location such as indoors, in a porch or on a windowsill. Outside is a whole different ecosystem but in a tended location pathogens, weeds or pests dormant in the soil can become active and kill off you seedlings very fast, so always use a sterile mix not garden soil to pot plants on.
Adding the mixture.
Once you have chosen your base and ensured that it is all
moist then its time to mix in the other ingredients.
In almost all cases these are:
- Perlite
- Vermiculite.
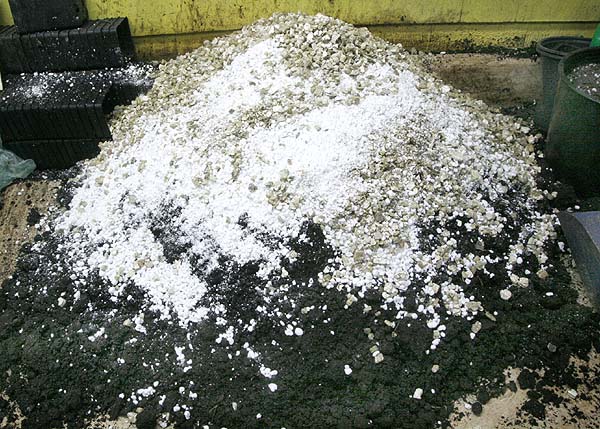
Potting mix ingredients ready to mix
The best results usually have about 15% of each perlite and vermiculite in a mix. These ingredients can be purchased in small bags from most garden centers or big box stores. If however you intend to use a lot of the material you may want to see if you can find a commercial source. Most greenhouse supply companies sell this material in large bags. Check your area to see if you can find one then call and ask if they will sell to the public. Many will not sell to you unless you have a business license. Bear in mind however that any business license will usually suffice it does not have to be horticulture.
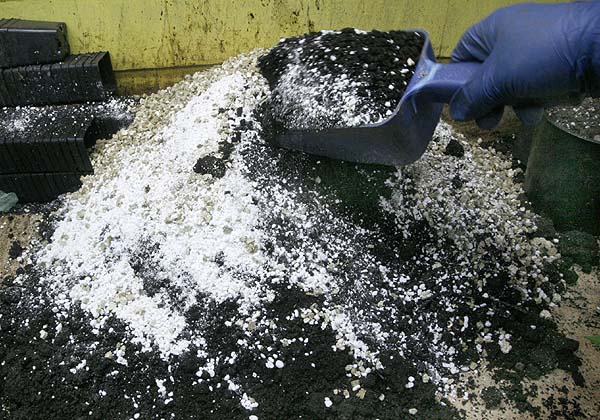
Mixing potting mix ingredients together
USE A MASK WHEN WORKING WITH PERLITE AND VERMICULITE.
Never work with these materials without using a face mask. Perlite
especially is extremely dusty and will not to your lungs any good at all.
Put on a face mask before opening the bag and moving the material. Use
a plastic scoop to move material from the bag to your potting mix once
the material has been added than you can mix it all together. Take a look
at the result and adjust the amount of any of the ingredients until you
have something that looks right. Time and experience is the best for this
using your own chosen materials. Small batches can be mixed on a potting
table larger batches can be made directly in a wheelbarrow.
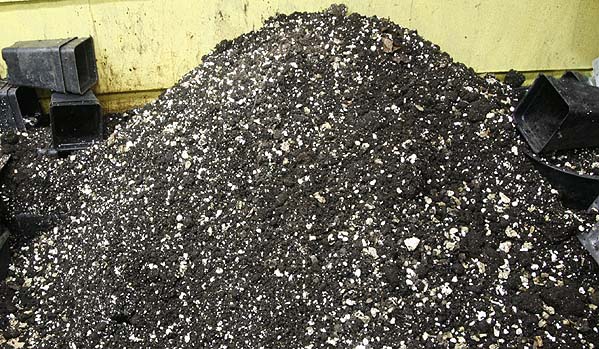
Completed mix should look something like this
Filling the pots
Once the mix is finished the pots can be filled. Scoop the
moist material into each pot and stack in the tray. When all the potting
mix has been used or enough pots have been filled then water all the pots.
If you have a stack of trays like we do then move all the trays around
so you can water each one well then restack them ready for planting. It's
important to ensure that the potting mix is well moistened before you
begin potting. Using the 'shower' setting on your hose pipe is the ideal
way to do this. Make sure you don't spray water all over your potting
area in the process as potting mix tend to cling to everything and you
will trample it everywhere.
Making 'holes'.
Seedlings need a hole to be planted into if they are a plug
or bare rooted they will still need a hole. The best way to do this is
with your gloved finger. (It's going to get really messy if you are not
wearing gloves while potting). Stick your finger into the center of each
pot to make a hole in the mix. If the hole does not stay there when you
pull your finger out but crumbles and falls in then your mix is not moist
enough. If it goes 'squelch' then its too wet and you need to let it dry
out a bit before planting.
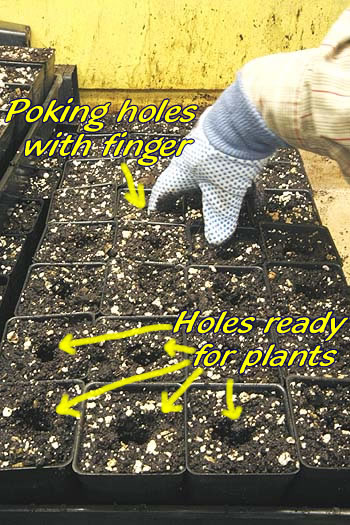
Making holes in potting mix ready for plants
When to repot.
Check on the root ball of your little seedlings. If they roots are
starting to show out of the bottom of the plug trays then it is the ideal
time to repot. The best time is when the roots have filled the cell so
that they hold the soil together while being moved to their new home.
This ensures the minimum disturbance to the roots. If the roots are still
small and the soil falls away from them then they are more prone to failure
on repotting. If the roots are so large that they have created a mass
of roots below the seeding tray then roots will be damaged on repotting
and plants will have a harder time. They may recover but it will take
longer for their roots to regrow before they can start creating more leaves
and getting larger.
Moving seedlings.
This is going to depend on how your seedlings were planted.
Assuming you have one plug per tray its going to depend on the size of the tray as to which tool you use to remove the plug from the tray. We use a variety of tools. For our larger plugs we use a stainless steel 'mini gardening tool' that are actually sold for indoor gardening but work wonderfully for this task. The long pointed 'shovel' of other mini tools works just as well.
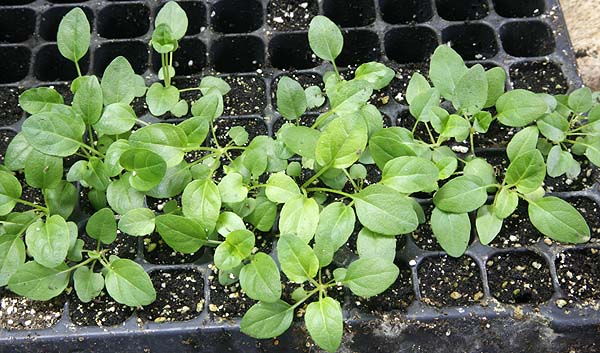
Tray of plug plants ready for potting on
For small plug trays it's a matter of pushing the plug out the bottom of the tray. For this we use a plastic rod. This one I got recycled from a pair of shoes that came with 'shoe holders'. Usually its trash to be thrown away but farmers are the ultimate in recycling.
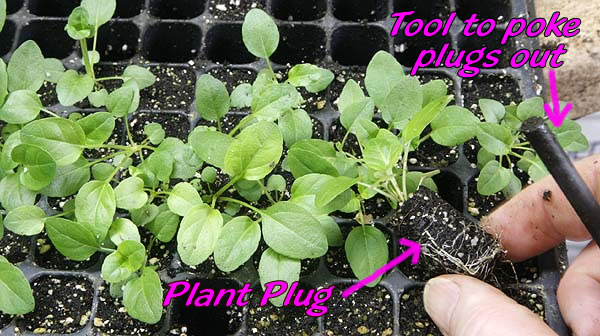
Plant plug removed from tray
Whatever tool you use to remove your little seedling from its original
home make sure that the roots come up cleanly in one lump of soil try
for as little root disturbance as possible when repotting. Sometimes the
soil will fall away from the roots in these cases make sure that the roots
are neatly tucked into the hole you created for the plant and gently pull
the soil in around the little plant.
With plug trays there is usually no reason at all to grab the plant when
repotting all the work should be done with the root ball this reduces
the stress on the plant.
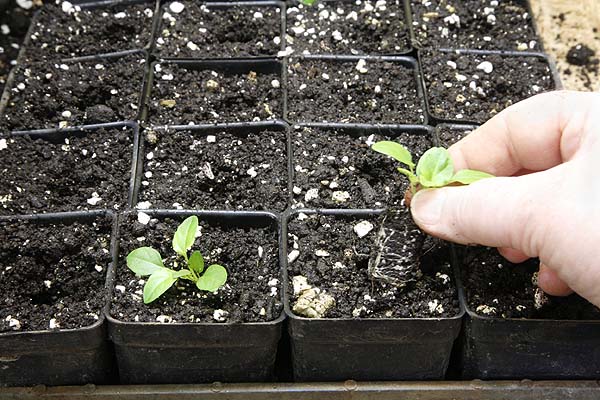
Placing plant plug in prepared hole in larger pot
General seeding flats.
In seeding flats is more difficult to move plants without disturbing
the roots. Plants need to be 'dug out' of the seed tray. Again the best
tools are the mini gardening tools sold for indoor gardening. The shovels
are ideal for this task. If you don't have one try a very small teaspoon.
(no all teaspoons are not the same size).
Carefully remove each plant ensuring you get all the roots. If plants
have grown together carefully and cautiously separate the roots from one
another trying not to break any roots. Transplant to new pots. You may
need larger holes and more time and care placing each plant to ensure
that all the roots are carefully in the pot and covered well with soil.
If there are any plants that are much smaller than the rest but have had
their roots disturbed by moving the larger ones you have the choice of
leaving them in the seeding tray or transplanting them at the same time.
It is often better to transplant unless they are very small as this means
the roots will only be disturbed once rather than twice. If the smaller
plants roots are nowhere near the plants you dug up then leave them to
get bigger before transplant.
Holding seedlings.
When moving seedlings from general flats and sometimes with plug
trays you have to get hold of the seedling. Some seedlings are very small
and fragile so great care must be taken. The main rule is.
NEVER GRAB THE SEEDLING BY THE STEM. You get that stem broken and it's
the end of the plant. It cannot regrow a central stem it's the only one
it has. ALWAYS hold a seedling by one of the leaves. I know that is not
always that easy, but it can regrow a leaf it cannot grow another stem.
For seeds with fragile stems like balsam, impatiens, peppers and such
like be very careful as the stems snap very easily. Some plants have much
more wiry stems and are easier to handle, but often they don't like it
and if you grab the stem the plant may not survive anyway so take care.
Another way to handle seedlings is using broad plastic tweezers to hold
the plant leaves while transplanting. This ensures that you have a good
grip on the plant without causing it too much harm. Fingers can be a little
large and clumsy when dealing with little seeds but plastic tweezers can
work very well. Make sure they have a broad end not a point. Metal tweezers
are usually too harsh. We used this method a lot before we changed to
using plug trays.
Plants with tap roots.
While many sources say that you cant grow plants with tap roots in
pots to begin with, its not true. It just means that you need to be very
careful not to disturb the roots when transplanting. There are several
important factors here.
1. Know that the plant you are dealing with has a tap root. It's
surprising how often people just treat all the plants the same and then
wonder why the ones with tap roots did not survive.
2. Always make sure that the plants are transplanted without disturbing
the root ball. That means, DON'T grow them in open flats use plug trays
or individual pots. When transplanting plugs make sure they are moved
before the roots come out the bottom more than just a little showing.
Transplant the whole ball without disturbance.
3. When planting out use the same methods as for plugs. Keep an
eye on the pots and move them out as soon as the roots start to show out
the bottom.
Once the plants are in their new pots.
The first thing to do is water them. Now using the misting nozzle
on you hose or the misting bottle you have been using. Make sure there
are well saturated.
Move the trays to a good location.
Locating your potted seedlings.
In many cases the pots can go back into the same area that you had
the seed trays. However they are now going to take up a LOT more space
than they did before so plan accordingly. In most cases the weather outside
is not yet suitable to put the pots out so find a good location inside
or in a very sheltered area out of the sun. Although daytime temperatures
may be good enough often the temperature drops too low at night. So if
putting plants outside keep a good eye on the overnight lows and move
the plants inside if they get below the high 40's.
Inside a window in full sun is acceptable or under grow lights. Find your
own best space. We used to use a large window in full sun to grow our
seedlings and our potted on plant them move them to a cool greenhouse
as they acclimatized. Now we have a new potting greenhouse with white
plastic to ensure that they plants to not fry in the hot sun.
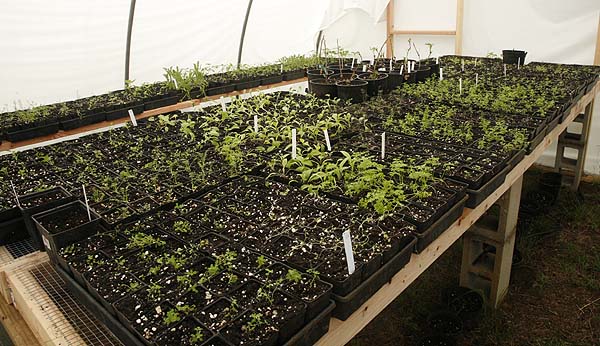
Trays of recently transplanted seedlings in our original potting house
As the seedlings grow.
Do not place any newly potted on plants outside in full sunshine.
They will need time to acclimatize to their new home and get their roots
established. This is known as hardening off. All new plants need to go
through this process before being placed in the ground to ensure the plants
survive. Once this is done you are ready for planting out.
OTHER NEW GARDEN INFORMATION
How to start seeds to get the best possible plants.
Tools You Need To Make A Simple Garden.
How to Choose a Potting or Seeding Mix.
What Plants should I grow in my new Garden?.
Designing your garden for summer heat
Potting on your seedlings get get the best possible plants.
| Janice Hazeldine PhD is the owner and head grower of Floral Encounters an organic Medicinal Herb farm that is also a designated sanctuary for pollinators. |