


How to start seeds to get the best possible plants.
Getting a head start on winter is important when starting seeds. Most people don't realize just how soon they need to start them. In most cases that's around the end of February to Early March. It may be later if you live in zone 5 or above and earlier if you live in zone 8 or more.
Always read the label.
Good seed companies will print important instructions about each
seed on the seed packet. Excellent seed companies will send you an general
instruction sheet and specific ones for seeds that need special care or
treatment. Its very important to always read the instructions before you
plant a seed. This way you wont be disappointed when the seed fails to
come up. If you have a seed that needs light to germinate and you cover
it then nothing is going to happen. If it needs soaking or roughing up
first and you don't do this you may get some germination but not that
much. If it needs stratifying and you don't carry this out then all you
get is bare soil. So read the instructions before you start. Good seed
companies let you know before you buy the seed if it needs special treatment
so make sure you read any information on the website about how to grow
the seeds before you buy it so you don't get a nasty shock when the instructions
arrive.
Preparing to plant your seeds.
How the seed is treated is going to depend on several factors one
of which is how large the seed is. Large seeds like beans, peas and such
like will either need their own individual pot to start in or will be
planted directly in the ground. Things like beans and peas do well sown
directly other large seeds may need a little more help and need to be
sown indoors first. Small to very tiny seeds will need extra care since
handling them is a much tougher job. For this reason there are several
different ways to grow seeds.
Seeding containers.
Most people tend to grow all their seeds in flats. This can be fine
but it has severe limitations.
Its very hard to remove some of the seedlings without disturbing the others.
- If some seeds have germinated and others have not yet done so
then the ungerminated ones get massively disturbed when the germinated
ones are removed. This means the others may now never germinate and your
seed count just went way down.
- New seedlings often the roots get all tangled around each other so its hard to separate one seedling from another. This damages either the roots or the stem of the little plant. Once the stem of the seedling has been snapped it's a goner. There is nothing you can do to save it. Lots of plants are killed this way because separating them is such a problem.
Cell or plug trays.
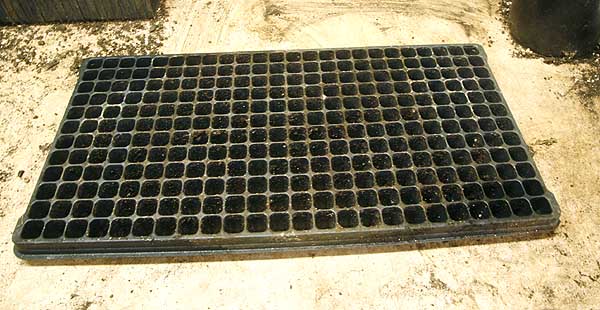
Small cell plug tray. This tray has 288 cells. Used for small to small-medium
seeds
Using individual cell trays removes these problems. These trays are like
flats but they are made up of small cells they are often called 'plug'
trays. Trays come in many different sizes so the correct size cell can
be selected for different size seeds. Small cells can be used for tiny
seeds and large cells for bigger seeds.
This has many advantages.
- Each seed can have its own individual cell to grow in, or if the seeds
are very tiny two or more per cell.
- As seedlings grow they can be removed individually and potted on without
disturbing the other seeds.
- Lots of different seeds can be sown in the same tray without any problems
with them getting mixed together.
- trays are easy to work with and move around.
Cells dry out fairly quickly since there is only a small amount of soil in each one, especially in the tiny ones. This means that they need to be watered far more often. Cells at either end of the tray are very susceptible to drying out and its often best not to plant these end rows. Though they should be filled with seeding mix.
Seeding compost.
When starting seeds its important to use a good seed starting compost,
not any old compost and certainly not the soil you scraped up from your
garden. Its important to give your seeds the best possible start in life.
That means a soil that is devoid of any weed seeds which would certainly
be in soil you scraped up outside. You need something that it is easy
for them to grow in that holds water well, does not dry out too fast and
has small enough particles that the little seeds don't have to fight around
large clumps or small rocks to get to the surface and grow.
Many places sell seeding compost. Look for one that has a balanced mix
of components. You may need to try out several different ones before you
find one that you like the best but then stick to that one.
SEED PLANTING METHODS.
Large seeds.
These are the really easy ones. If your seeds are the size of a pea
then plant them in individual pots. Seeds this size don't need a really
fine potting soil and regular potting soil can be used. Still don't use
soil from outside as it will bring in weed seeds. There are two methods
you can use.
- Fill all the pots first
- Water them and let them drain
- Poke a small hole in the compost and drop the seed in, cover it. Don't plant too deeply!
OR
- Fill the pots less about ¾" (2 cm) of.soil.
- Put a seed in each pot
- Add the rest of the compost
- water well and let pots drain.
Personally I prefer the first method, I find it easier to do but its your choice.
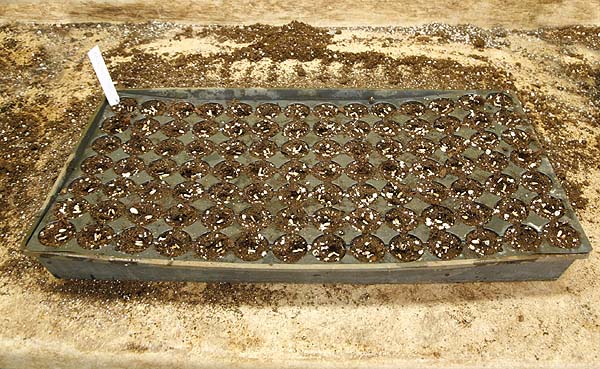
Filling your seeding trays.
All other seeds need to be planted in seeding trays, flats or individual cell trays. Cell trays come in many different sizes with different size cells. We use two different ones, small cells for tiny seeds and ones with 2" cells for larger seeds. Whatever receptacle you use it needs to be filled properly with seeding mix.

Half filled seeding flat. Used identical tray to push seeding mix
into the cells. Needs more mix and repeat.
- Spread the seeding mix over the tray and push it into each
individual cell. The best way to do this is to pile a good layer of the
material on top of the tray then get a identical tray and fit it on top
to press the mix down into the cells. You may need to use two or more
trays together if the trays you use are flimsy to get enough strength.
Once the mix is pressed down, add a second layer and repeat. Then its
time to get in with your hands and make sure that the soil is really firmed
down well. Fingers are always the best judge of how much mix is pushed
down into the tray.
- Water the mix. Using the spray option on your kitchen facet is ideal.
Allow the trays to drain and the water to be fully taken up by the mix
before you proceed.
- Firm the soil down again. Often its very 'fluffy' until its wet then
suddenly you find there is very little soil in the cell or tray at all.
If there is not enough soil then add more and re-water it.
- Fill trays to within ¼" (0.6 cm) of the top of each cell.
- Plant the seeds. Seed details below.
- Spread a light layer of soil over the top of the seeds. Before you do this make sure that the seeds you are planting don't need light to germinate if they do then leave this step out.
Adding that top layer of soil.
The best way to do this to ensure that you are not adding too much
is to use a sieve. A simple metal one that can be purchased in any dollar
store or market stand. Place the potting mix in the sieve then shake it
gently over the seed tray like sifting flour. Cover the seeds in a fine
gentle fluffy layer. This gives enough mix to cover the seeds without
burying them too deeply that they cannot grow. After all in the wild they
don't get buried in the ground they just have to hope that they get covered
up a bit. So they don't want to be deep. Just lightly covered.
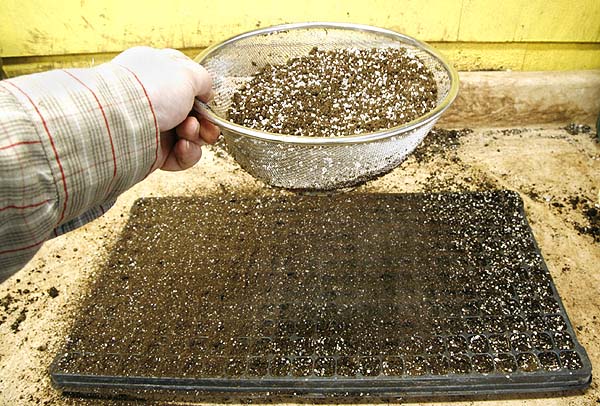
Use a sieve to shake a fine layer of seeding mix onto the top of seeds.
This way they are not covered too deeply and you get a good even coating.
METHODS OF SEEDING.
Medium seeds.
If the seeds are large enough to handle then they can be moved one
by one into the cells or placed in rows in your seed tray. In seed trays
make sure they are well spaced. Plug trays use one cell per seed. If you
have difficulty moving the seeds use a pair of flat ended tweezers to
move the seeds around. These are an invaluable tool for any gardener who
is seeding.
Trays with larger cells can be used for medium seeds. One or two seeds per cell. These Echinacea seeds are waiting to be covered.
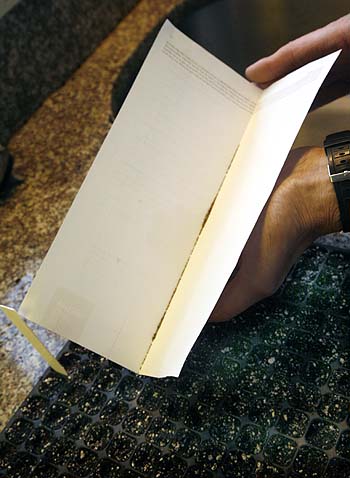 Use a stiff folded piece of paper. Seeds will line up in the fold and can easily be dropped exactly where you want them with just a gentle tap. |
Smaller seeds. |
Very small seeds.
Once seeds get to the 'almost dust like' size its harder to use the
paper method as they tend to clump together. Some people use the 'pinch'
method hoping that pinching and spreading like salt on food will distribute
the seeds well but it can cause clumping.
The best way to evenly distribute fine seed it is by using an old pepper shaker. Take a small portion of dry fine sand or loam - do not use beach sand unless you wash and dry it well first as the salt in the sand can affect the seedlings. Pick a sand or loam that is a different color from the seeding mix that you have chosen.
Mix the seeds with a portion of the sand and place in the pepper shaker.
Shake well to ensure an even distribution of the seed throughout the sand.
Then shake the mixture out across the tray. The sand will ensure a more
even distribution and you can see where you have shaken by the sand color.
Make sure you buy a pepper shaker for this purpose don't use the one from
the kitchen you wont get it clean again and the family will not be happy
with you. Inexpensive shakers can often be found in dollar stores or market
stalls.
Planting more than one species in a single tray.
The advantage of plug tray is that you can plant a lot of different
seeds in the same tray. This means you can save space if you only have
a few seeds. The small plug trays have 288 cells so that's a lot of seeds.
However there are some factors to consider before doing this.
1. Plant the same size seeds in the same tray. Don't put larger
seeds with smaller ones.
The larger seeds will grow larger and faster and will shade out the small
ones. This means that they may likely die. Plant all the same size seeds
together. If using small plug trays it is often advisable to leave one
row empty between each species to allow for them growing at different
rates and reduce overshadowing.
2. If you have any experience with seeds or can find information on germination times then put all the seeds that germinate at the same rate together. If you have some seeds that germinate in 6 days next to some that don't come up for four weeks then the 6 day ones are going to be pretty big before the others even emerge. This will mean that they could easily be overshadowed for light and will not do anything like as well.
Make sure you label your seeds!
Using plastic plant labels is an excellent way to label seeds. This
is especially important if you are planting more than one species in a
tray, but even full trays should be labeled with the plant name and the
date that it was seeded. This way you can monitor how long seeds take
to germinate. Labeling is vitally important. It is surprising how easy
it is to forget what you seeded and when especially if you are seeding
many things at the same time. Always label your seeds so you don't have
to guess what they are later.
Watering.
Water with a misting spray bottle or the mist setting on a hose nozzle.
If you have a lot of seeds but don't want to use a hose pipe purchase
a chemical spray bottle. They are sold in almost all garden stores for
spraying chemicals on your plants during the summer months. Fill it with
plain water and use it to spray your seedlings. Make sure you have one
that is dedicated ONLY to this purpose. NEVER use a bottle that has been
used for any other reason or you could quickly kill off your plants. These
bottles are fairly inexpensive and come in anything from one to 5 gallon
sizes. They are ideal for those with quite a few seed trays. This is the
method we have used for many years on our farm.
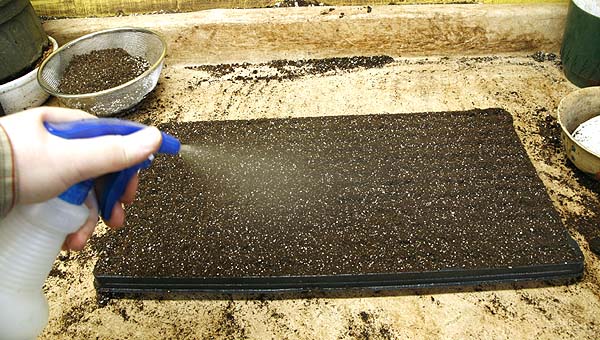
Use a spray bottle to mist seedlings once they are planted.
Seedlings will need to be sprayed at least once a day. If they are in
the sunshine they may need more than this. Small plug trays dry out very
quickly so ensure that the seeding mix is always moist, not saturated
wet but moist.
We prefer to keep our seeds in open air not in a 'tent' structure that
some people recommend. This can often increase fungal growth and make
the seeds very prone to damping off fungus.
Once the seedlings are started to grow they will need more water so longer spraying sessions will be needed. When the seedlings reach about one inch high those in cell trays can often be watered using a thin spouted house plant watering can. The roots have bound the soil together enough to stop it floating away and they need more water. Using this method far more water can be delivered to each seedling than with the mist sprayer. Take care however if you have several different species of seeds planted in one tray. If the seeds are not all grown at the same rate then this method is unsuitable.
Once the seedling have reached the second pair of leaf stage add some liquid fertilizer to the spray (or can). The amount of 'food' in seed starting mix is very small and in individual cells it is used up very quickly. Extra feeding at this stage will ensure strong healthy seedlings.
Lighting
While only some seeds need light to germinate it best to put all
the trays in lighted areas immediately they have been seeded. This ensures
that they seedlings will get light as soon as they germinate. There are
many methods used for lighting.
1. By a window.
This is the most common and easiest method. Place the trays right
next to the window as close as you can on a table or flat surface above
the window bottom. Do not place them below the level of the window of
they will not get enough light. If your table is not high enough find
something to put under the legs to raise it up. Use a south or west facing
window for the best light. Do not use a north facing window it will be
too cold and have very poor light. If you are placing the trays narrow
end to the window consider rotating them every few days so that the seeds
at the back of the tray get as much light as the ones at the front.

Seed trays in west facing window.
2. Artificial light.
Many people now use grow lights and grow stations to grow their plants.
This is an excellent use but if using lights remember that even though
they look bright they are not really putting out as much light as you
think. The trays need to be very close to the lights. Not more than 12-
18" above the tray. The best systems allow you to raise and lower
the lights as the seedlings grow. Putting lights well above the level
of the trays is very similar to placing a tray in the center of the room
rather than next to the window. Plants see light very differently than
we do so what we think is bright to us is not to a plant.
3. In a Greenhouse.
This of course is the best method of all, but not available to many
people. If you have this luxury make sure that it stays warm enough for
the seedlings but not so hot that it will fry them when the sun comes
out. Greenhouse growing is a whole topic unto itself.
Once your seedlings have grow to a reasonable size you can start potting
them on into larger pots. Read our potting on article.
| Janice Hazeldine PhD is the owner and head grower of Floral Encounters an organic Medicinal Herb farm that is also a designated sanctuary for pollinators. |